


You are using an out of date browser. It may not display this or other websites correctly.
You should upgrade or use an alternative browser.
You should upgrade or use an alternative browser.
TEMCo Auto Sharpener - User Review Thread
- Thread starter Philbert
- Start date
wcorey
Pinnacle OPE Member
- Local time
- 11:06 PM
- User ID
- 29
- Joined
- Dec 11, 2015
- Messages
- 1,067
- Reaction score
- 4,606
- Location
- ma usa
Good thought, but, no. Groove is integral in the cast aluminum housing; cover does not have anything to do with the groove width. There are also magnets (?) which appear to be related to the proximity sensor (guessing here) and a clamp that holds one of the drive links near the cutter being ground (about 1 o'clock in photo); need to be careful about those.
I measured the groove at approximately 0.060" - 0.061", with feeler gauges, so it might be possible to widen it with some patience, and abrasive cloth, to take 0.063 chain. But I will leave that to the manufacturers and designers. Not sure if there would be other consequences.
Have not tried to fit 0.058 chain yet.
View attachment 159984
Philbert
Have you tried running an 063 drive link or equivalent shim through just the clamping portion to see if it clears?
GunTemco
Well-Known OPE Member
So here's a quick explanation as to why widening the groove won't just solve everything: yes, widening the groove to accommodate 063 chain will work, but doing so causes problems for clamping smaller chains.
So, for example, if all you run through it 063, milling out the groove will let you run only 063 well. Smaller chains will have clamping issues.
So, for example, if all you run through it 063, milling out the groove will let you run only 063 well. Smaller chains will have clamping issues.
Philbert
Chainsaw Enthusiast
- Local time
- 10:06 PM
- User ID
- 737
- Joined
- Jan 30, 2016
- Messages
- 4,434
- Reaction score
- 17,906
- Location
- East Dakota
I am confident that you guys will work it out, now that you know it is an issue.. . . if all you run through it 063, milling out the groove will let you run only 063 well. Smaller chains will have clamping issues.
Some grinders use shims for different gauge chains.
Philbert
wcorey
Pinnacle OPE Member
- Local time
- 11:06 PM
- User ID
- 29
- Joined
- Dec 11, 2015
- Messages
- 1,067
- Reaction score
- 4,606
- Location
- ma usa
So here's a quick explanation as to why widening the groove won't just solve everything: yes, widening the groove to accommodate 063 chain will work, but doing so causes problems for clamping smaller chains.
So, for example, if all you run through it 063, milling out the groove will let you run only 063 well. Smaller chains will have clamping issues.
Clamping issues due to a loose fit in the groove?
Then a shim that drops into the whole groove, or at least the incoming part.
Insufficient travel and or angle/geometry issues at the clamp?
Couldn't you just add a threaded adjuster knob at the red circle and/or an eccentric pivot pin or a drop in shim at the green arrow?
Could have a spring loaded ball with detents on either/each for the various gauge settings.

usmcbuckwild
Buck
- Local time
- 11:06 PM
- User ID
- 4866
- Joined
- Dec 24, 2017
- Messages
- 3,771
- Reaction score
- 23,964
- Location
- NW CT
Clamping issues due to a loose fit in the groove?
Then a shim that drops into the whole groove, or at least the incoming part.
Insufficient travel and or angle/geometry issues at the clamp?
Couldn't you just add a threaded adjuster knob at the red circle and/or an eccentric pivot pin or a drop in shim at the green arrow?
Could have a spring loaded ball with detents on either/each for the various gauge settings.
View attachment 160050
Longer throw on the “ram” that applies pressure to the locking arm? Or, just have 2 different locking arms, one for 0.050/0.058 and one for 0.063. Change out chains, just change out the locking arm.
fearofpavement
Pinnacle OPE Member
- Local time
- 11:06 PM
- User ID
- 304
- Joined
- Dec 28, 2015
- Messages
- 1,805
- Reaction score
- 6,225
- Location
- Georgia
For the low entry level price, it may be that it would be more economical for someone that grinds a lot of different chains to have two grinders, one for .043/.050 and one for .058/.063.
If the grinder has enough bells and whistles to handle every situation, it may price itself out of the "entry level" cost scenario it now holds by itself. I don't think it would take much to manufacture the machine for a different gauge, just complex to design a single machine to do them all.
If the grinder has enough bells and whistles to handle every situation, it may price itself out of the "entry level" cost scenario it now holds by itself. I don't think it would take much to manufacture the machine for a different gauge, just complex to design a single machine to do them all.
Philbert
Chainsaw Enthusiast
- Local time
- 10:06 PM
- User ID
- 737
- Joined
- Jan 30, 2016
- Messages
- 4,434
- Reaction score
- 17,906
- Location
- East Dakota
Because I'm All About the Base
I know that some guys are in a hurry to stick a chain in this thing. I wanted to get to know it a bit, become familiar with it, before I mounted it for the first time.
Made a plywood board a little over 6 inches wide. 18 inches would be a good length for clamping the FP1000 to a work surface - this one is a bit shorter to fit in the carton for shipping.

The mounting holes are very small (5/32"), which fit the sheet metal screws provided. I wanted a more secure, and removable mount, so I introduced the grinder to my friend, Mr. Dremel, and they now accept 10-24 machine screws, which fasten into 'T- nuts in the base.

As with other grinders, other options might include:
- a base with a cleat, to mount in a bench vise when needed;
- a base with a post, to mount in the stake pocket of a pickup truck bed, for 12V operation;
- brackets to attach to a stand, step ladder, saw horses, etc.;
- multiple bases for different locations ('T'- nuts make this easy).
Just be sure that the mounting surface is high enough so that the longest chains you sharpen clear the ground.
The screws holding the clear, wheel guard are also quite small. Each screw requires approximately (40) quarter turns to remove the guard; this was after learning that the screws do not have to be completely removed. But 2 screws, removed, then replaced, requires a lot of wrist motion. And, if you do the depth gauges . . . well, you do the math. The small, Phillips heads do not lend themselves well to repeated use with a power driver; I think that they would strip out quickly.
I am finding that the manual is helpful, but I really need those You Tube videos
.
I hope that TEMCo makes both available for download on their site - guys who do not have good Internet access might want them on their computer (or burned to a DVD) for reference. I also added a few labels with my labelmaker for OCD reasons.

Starting to play with some scrap chains (as I recommend everyone to do with a new grinder), before moving to good loops. I do not want to post any pictures of cutters until I have a good understanding of how it works, as it might not be a fair representation of the grinder's abilities.
Philbert
I know that some guys are in a hurry to stick a chain in this thing. I wanted to get to know it a bit, become familiar with it, before I mounted it for the first time.
Made a plywood board a little over 6 inches wide. 18 inches would be a good length for clamping the FP1000 to a work surface - this one is a bit shorter to fit in the carton for shipping.
The mounting holes are very small (5/32"), which fit the sheet metal screws provided. I wanted a more secure, and removable mount, so I introduced the grinder to my friend, Mr. Dremel, and they now accept 10-24 machine screws, which fasten into 'T- nuts in the base.
As with other grinders, other options might include:
- a base with a cleat, to mount in a bench vise when needed;
- a base with a post, to mount in the stake pocket of a pickup truck bed, for 12V operation;
- brackets to attach to a stand, step ladder, saw horses, etc.;
- multiple bases for different locations ('T'- nuts make this easy).
Just be sure that the mounting surface is high enough so that the longest chains you sharpen clear the ground.
The screws holding the clear, wheel guard are also quite small. Each screw requires approximately (40) quarter turns to remove the guard; this was after learning that the screws do not have to be completely removed. But 2 screws, removed, then replaced, requires a lot of wrist motion. And, if you do the depth gauges . . . well, you do the math. The small, Phillips heads do not lend themselves well to repeated use with a power driver; I think that they would strip out quickly.
I am finding that the manual is helpful, but I really need those You Tube videos
I hope that TEMCo makes both available for download on their site - guys who do not have good Internet access might want them on their computer (or burned to a DVD) for reference. I also added a few labels with my labelmaker for OCD reasons.
Starting to play with some scrap chains (as I recommend everyone to do with a new grinder), before moving to good loops. I do not want to post any pictures of cutters until I have a good understanding of how it works, as it might not be a fair representation of the grinder's abilities.
Philbert
Last edited:
jakethesnake
I Am The Snake
- Local time
- 11:06 PM
- User ID
- 786
- Joined
- Feb 5, 2016
- Messages
- 7,028
- Reaction score
- 18,339
- Location
- Here & Now
You are a gentleman philbert. Get to know her first.Because I'm All About the Base
I know that some guys are in a hurry to stick a chain in this thing. I wanted to get to know it a bit, become familiar with it, before I mounted it for the first time.
Philbert
usmcbuckwild
Buck
- Local time
- 11:06 PM
- User ID
- 4866
- Joined
- Dec 24, 2017
- Messages
- 3,771
- Reaction score
- 23,964
- Location
- NW CT
Excellent info and forethought. Following this closely
1990Husky262
Super OPE Member
- Local time
- 11:06 PM
- User ID
- 720
- Joined
- Jan 28, 2016
- Messages
- 115
- Reaction score
- 230
- Location
- Massacusetts
cant wait to see it in action
Philbert
Chainsaw Enthusiast
- Local time
- 10:06 PM
- User ID
- 737
- Joined
- Jan 30, 2016
- Messages
- 4,434
- Reaction score
- 17,906
- Location
- East Dakota
There are videos on the YouTube site, referenced above, which show it in operation. I will be posting mostly photos.cant wait to see it in action
Philbert

Leafy
Super OPE Member
Interesting, it clamps on just 1 drive link? Dont you think it would be a better idea to clamp on at least the drive links on either side of the link being ground? Or better yet, on the side plates of the link being ground.
1990Husky262
Super OPE Member
- Local time
- 11:06 PM
- User ID
- 720
- Joined
- Jan 28, 2016
- Messages
- 115
- Reaction score
- 230
- Location
- Massacusetts
There are videos on the YouTube site, referenced above, which show it in operation. I will be posting mostly photos.
Philbert
I have seen the videos. What i should of said is cant wait to see an unbiased review from some body that knows chains. Cant wait to see what you think of it
panolo
Well-Known OPE Member
- Local time
- 10:06 PM
- User ID
- 6196
- Joined
- May 19, 2018
- Messages
- 6
- Reaction score
- 36
- Location
- Central Minnesota
I'm not on the level of many of you when it comes to chains and sharpening. I pretty much run full chisel on everything I have including long bars and tend to have a minimum of 5 chains for every bar and I saw I own from 14" to 32". I have a manual grinder that was gifted to me(not a nice one but a cheepy) that I have become decent at using. I also have every hand sharpener known to man from stihl 2-1's, husky roller kits, timberline, etc. For me it has never been about anything other than the time. I need the best edge I can get in the shortest time frame. I never have enough free time and when I can get out of the office or away from home I would rather be running a saw or wetting a line rather than sharpening chains. I cut wood to heat my home and even though I have some nice equipment I haven't been interested in changing pitch's, sprockets, etc. Almost all my chains are .050, 3/8 or .325 and I have a mix of stihl rs, oregon lpx, and husky x-cut.
Setup on the machine was easy. Was packaged great. However calibration to do my first chain was a pain. I thought the machine was broken but I didn't catch a step so after a call to TEMCo and a conversation with the engineer who designed it I had it figured. Basically you need to make sure the knobs are spun out 3/4" to ensure you have the travel to adjust the arm when the wheel is lined up in the tooth. Plus the forward adjustment on the arm is two part with the knob(arm doesn't move forward with the knob turn) and using he "-" key to move the arm forward after turning the knob. Took me less than 5 minutes to setup once I got home last night. I want to add that the customer service was absolutely fantastic! Great people who were extremely helpful!
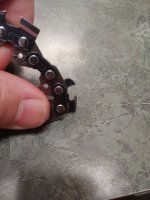
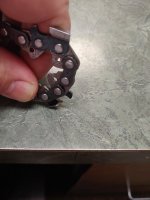
I don't have any bad chains to practice on so I grabbed a stihl chain that I grounded in the dirt making the last few cuts of the day on some frozen logs. My dealer gives you 20% off if you buy 10 or more chains so I usually buy them in bulk and if I ruined this one it wouldn't hurt so bad. Once dialed in I hit the start button and it whizzed away. My depth was a tich too deep but not deep enough that I got into the strap and I probably was a hair to tight on the cut but I didn't burn the tooth. I have always used the grinder as less is more and if you need to make a second pass so be it.
Here are the photos. Smart phone doesn't take the best pics. Any questions feel free to holler.
Setup on the machine was easy. Was packaged great. However calibration to do my first chain was a pain. I thought the machine was broken but I didn't catch a step so after a call to TEMCo and a conversation with the engineer who designed it I had it figured. Basically you need to make sure the knobs are spun out 3/4" to ensure you have the travel to adjust the arm when the wheel is lined up in the tooth. Plus the forward adjustment on the arm is two part with the knob(arm doesn't move forward with the knob turn) and using he "-" key to move the arm forward after turning the knob. Took me less than 5 minutes to setup once I got home last night. I want to add that the customer service was absolutely fantastic! Great people who were extremely helpful!
I don't have any bad chains to practice on so I grabbed a stihl chain that I grounded in the dirt making the last few cuts of the day on some frozen logs. My dealer gives you 20% off if you buy 10 or more chains so I usually buy them in bulk and if I ruined this one it wouldn't hurt so bad. Once dialed in I hit the start button and it whizzed away. My depth was a tich too deep but not deep enough that I got into the strap and I probably was a hair to tight on the cut but I didn't burn the tooth. I have always used the grinder as less is more and if you need to make a second pass so be it.
Here are the photos. Smart phone doesn't take the best pics. Any questions feel free to holler.
Attachments

usmcbuckwild
Buck
- Local time
- 11:06 PM
- User ID
- 4866
- Joined
- Dec 24, 2017
- Messages
- 3,771
- Reaction score
- 23,964
- Location
- NW CT
I'm not on the level of many of you when it comes to chains and sharpening. I pretty much run full chisel on everything I have including long bars and tend to have a minimum of 5 chains for every bar and I saw I own from 14" to 32". I have a manual grinder that was gifted to me(not a nice one but a cheepy) that I have become decent at using. I also have every hand sharpener known to man from stihl 2-1's, husky roller kits, timberline, etc. For me it has never been about anything other than the time. I need the best edge I can get in the shortest time frame. I never have enough free time and when I can get out of the office or away from home I would rather be running a saw or wetting a line rather than sharpening chains. I cut wood to heat my home and even though I have some nice equipment I haven't been interested in changing pitch's, sprockets, etc. Almost all my chains are .050, 3/8 or .325 and I have a mix of stihl rs, oregon lpx, and husky x-cut.
Setup on the machine was easy. Was packaged great. However calibration to do my first chain was a pain. I thought the machine was broken but I didn't catch a step so after a call to TEMCo and a conversation with the engineer who designed it I had it figured. Basically you need to make sure the knobs are spun out 3/4" to ensure you have the travel to adjust the arm when the wheel is lined up in the tooth. Plus the forward adjustment on the arm is two part with the knob(arm doesn't move forward with the knob turn) and using he "-" key to move the arm forward after turning the knob. Took me less than 5 minutes to setup once I got home last night. I want to add that the customer service was absolutely fantastic! Great people who were extremely helpful!
I don't have any bad chains to practice on so I grabbed a stihl chain that I grounded in the dirt making the last few cuts of the day on some frozen logs. My dealer gives you 20% off if you buy 10 or more chains so I usually buy them in bulk and if I ruined this one it wouldn't hurt so bad. Once dialed in I hit the start button and it whizzed away. My depth was a tich too deep but not deep enough that I got into the strap and I probably was a hair to tight on the cut but I didn't burn the tooth. I have always used the grinder as less is more and if you need to make a second pass so be it.
Here are the photos. Smart phone doesn't take the best pics. Any questions feel free to holler.
Great info!
It looks to have done a pretty good job. Maybe a little too much hook? Its all in the adjustments I guess. When you run it, let us know how it cuts.
GunTemco
Well-Known OPE Member
Thanks for that quick little review @panolo!
We talked a bit about this in the other forum and also wanted to post here that I'm glad you were able to contact our customer support. We understand that the FP1000 has a little bit of getting acquainted with at first, but trust me that it'll become easy once you run a few more chains through it.
Let us know when you run some more beat up ones through it!