You are using an out of date browser. It may not display this or other websites correctly.
You should upgrade or use an alternative browser.
You should upgrade or use an alternative browser.
Pics of homemade chainsaw mills
- Thread starter Crzybowhntr
- Start date
-
- Tags
- alaskan chainsaw mill granberg
Crzybowhntr
Apprentice Slacker
Great pics. Thanks a lot.There's a few drawbacks to the way I build it. One size only... it's welded So it will not adjust for other size of bars and the handles don't move.
There's definitely a few things I feel are a must like extra piece that I am pointing to with the wrench. It really gives the mill stability when you start your next cut without your rails. I added it after a few test cuts I also add the second handle were I felt like I liked my hand. it's the one towards the tip.
View attachment 55832
View attachment 55833
flying pig
Super OPE Member
- Local time
- 12:02 AM
- User ID
- 1563
- Joined
- Jul 17, 2016
- Messages
- 295
- Reaction score
- 1,006
- Location
- Grande Prairie, Alberta


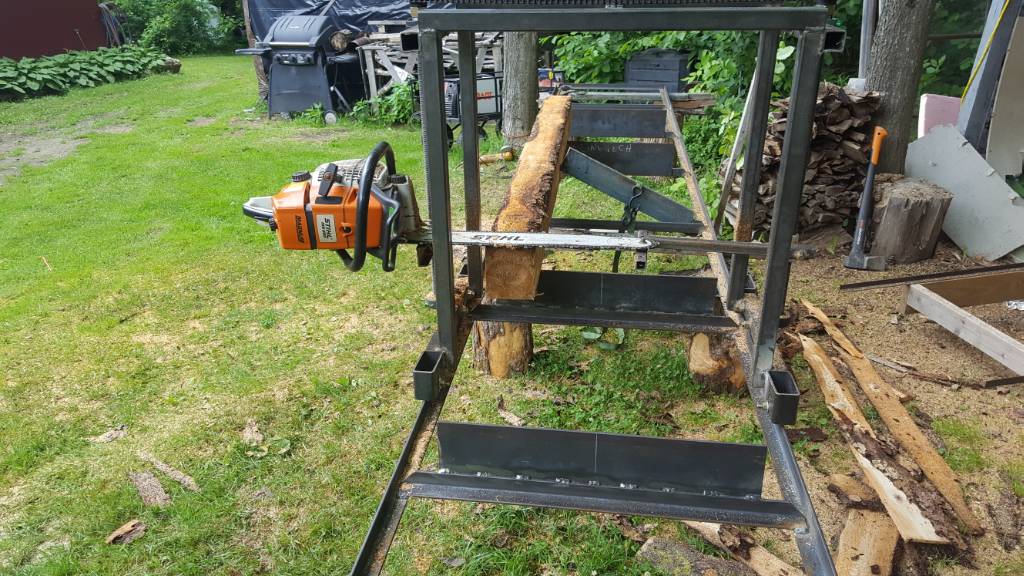
This set up is working really well for me. It's on a 36" bar and gives 34" cut width. It needs a cross bar handle and a few other tweaks but both saw and mill work quite well. Total weight is about 50lbs including the 2100 hanging off the end
Crzybowhntr
Apprentice Slacker
Is that 1" inside of 1 1/4" at the end of the mill in the first pic? Does it slide in and out pretty well because I`d like to use the same type of setup but want the flexibility to use a 20" - 36" bar? If it it 1" inside of 1 1/4" did you have to grind the weld seam inside the 1 1/4'?View attachment 56274 View attachment 56275
This set up is working really well for me. It's on a 36" bar and gives 34" cut width. It needs a cross bar handle and a few other tweaks but both saw and mill work quite well. Total weight is about 50lbs including the 2100 hanging off the end
flying pig
Super OPE Member
- Local time
- 12:02 AM
- User ID
- 1563
- Joined
- Jul 17, 2016
- Messages
- 295
- Reaction score
- 1,006
- Location
- Grande Prairie, Alberta
Yes it is, and no it worked out pretty well. We've got it set to run a 36 or 42 bar.
Actually it might be 3/4" square stock inside 1" I can't remember for sure. The square stock is drilled and tapped.
Actually it might be 3/4" square stock inside 1" I can't remember for sure. The square stock is drilled and tapped.
Last edited:
- Local time
- 8:02 AM
- User ID
- 1204
- Joined
- Apr 28, 2016
- Messages
- 11,539
- Reaction score
- 43,895
- Location
- Croatia
Watching!
I occasionally have the opportunity to plank some really nice huge logs, not having a mill setup those logs end up being bucked into firewood.
I will have to look into building at least a simple one size setup for my 36" bar.
Nice custom mill setups You guys have!")
I occasionally have the opportunity to plank some really nice huge logs, not having a mill setup those logs end up being bucked into firewood.
I will have to look into building at least a simple one size setup for my 36" bar.
Nice custom mill setups You guys have!
Crzybowhntr
Apprentice Slacker
I started gathering materials and hope to start building it next week.
dall
Mastermind Approved!
- Local time
- 2:02 AM
- User ID
- 795
- Joined
- Feb 5, 2016
- Messages
- 46,193
- Reaction score
- 184,767
- Location
- grafton wv
what all do you have jameyI started gathering materials and hope to start building it next week.
Crzybowhntr
Apprentice Slacker
I have all the nuts, bolts, and some 3/4" tube. Really all I need is some of that 1" tube you got laying around. And for you twisted minds out there reading this - By tube I mean the METAL tubing.
Crzybowhntr
Apprentice Slacker
I have some flat stock too
flying pig
Super OPE Member
- Local time
- 12:02 AM
- User ID
- 1563
- Joined
- Jul 17, 2016
- Messages
- 295
- Reaction score
- 1,006
- Location
- Grande Prairie, Alberta


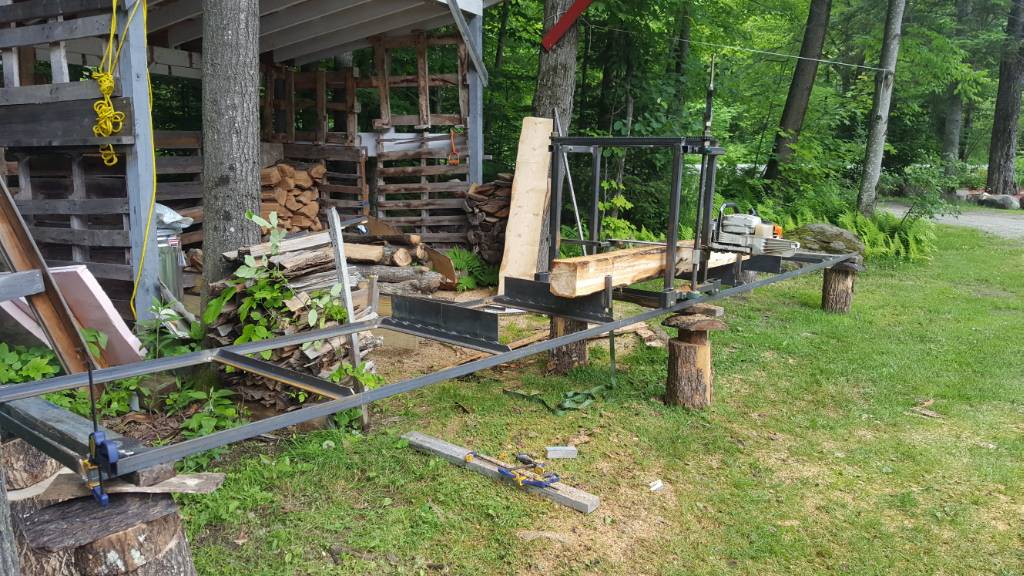
Started reading Mallof's book and made a few changes to my mill.
One of the changes I made was the addition of a horizontal handlebar that is RTV anti vibe mounted. I used aluminum plates to mount the bar. The bar itself is made out of a section of very thin walled steel tube from an old room handle. I made inserts for the ends and threaded them for 1/4" NC bolts. The inserts are about .050" smaller than the ID of the tube. I filled the rest with RTV to make a soft anti-vibe mount for the bar. The bars are now wrapped in a generous grippy layer of hockey tape.
I deleted the clutch cover for better dust evacuation and hopefully better cooling. Thought I'd try it and see anyway. I've had the clutch get hot enough to lock up engagement. I milled an aluminum bar plate to allow this.
The exhaust deflector was removed. Hopefully the exhaust shooting down instead of out across the mill will be easier on the lungs.
I drilled the bar and added locating dowels. I've had the mill walk over into the chain. The dowels made it a lot solider mount and should be super consistant.
I drilled a hole so that I could reach the chain adjuster.
I made a recess in the one T bar so I can grease the bar tip (at least when the bar is flipped one direction).
I flipped the skid wheels around to gain clearance for the cylinder cover. This loses me about 1.5" of cut width but is non permanent and can be turned back around if I need the full 34" cut width.
I also richened the saw up a little and did Mallof's grind on my chain (it's getting way down anyway so I thought it would be a good time to experiment).
Guess we'll see how well it works next time out.
Last edited:
Lightning Performance
Here For The Long Haul!
- Local time
- 2:02 AM
- User ID
- 677
- Joined
- Jan 26, 2016
- Messages
- 10,991
- Reaction score
- 28,050
- Location
- East of Philly
bump
flying pig
Super OPE Member
- Local time
- 12:02 AM
- User ID
- 1563
- Joined
- Jul 17, 2016
- Messages
- 295
- Reaction score
- 1,006
- Location
- Grande Prairie, Alberta
I forgot about this thread!
The mill works pretty well perfectly now. I'm moving backwards with the guide rail set up though. A true cut to length guide board is still the best way IMO.
I'd like to try putting a 3120 top end on a 2100 to see how that would work for milling.
I also just bought a circular mill and will be restoring it and putting it to work in the coming months. Then chainsaw milling might really take a lower position on the priority list.
czar800
Mastermind Approved!
- Local time
- 2:02 AM
- User ID
- 533
- Joined
- Jan 14, 2016
- Messages
- 7,160
- Reaction score
- 37,440
- Location
- Ellwood City
View attachment 67347 View attachment 67348 View attachment 65785 View attachment 65786 View attachment 65787
Started reading Mallof's book and made a few changes to my mill.
One of the changes I made was the addition of a horizontal handlebar that is RTV anti vibe mounted. I used aluminum plates to mount the bar. The bar itself is made out of a section of very thin walled steel tube from an old room handle. I made inserts for the ends and threaded them for 1/4" NC bolts. The inserts are about .050" smaller than the ID of the tube. I filled the rest with RTV to make a soft anti-vibe mount for the bar. The bars are now wrapped in a generous grippy layer of hockey tape.
I deleted the clutch cover for better dust evacuation and hopefully better cooling. Thought I'd try it and see anyway. I've had the clutch get hot enough to lock up engagement. I milled an aluminum bar plate to allow this.
The exhaust deflector was removed. Hopefully the exhaust shooting down instead of out across the mill will be easier on the lungs.
I drilled the bar and added locating dowels. I've had the mill walk over into the chain. The dowels made it a lot solider mount and should be super consistant.
I drilled a hole so that I could reach the chain adjuster.
I made a recess in the one T bar so I can grease the bar tip (at least when the bar is flipped one direction).
I flipped the skid wheels around to gain clearance for the cylinder cover. This loses me about 1.5" of cut width but is non permanent and can be turned back around if I need the full 34" cut width.
I also richened the saw up a little and did Mallof's grind on my chain (it's getting way down anyway so I thought it would be a good time to experiment).
Guess we'll see how well it works next time out.
Very nice setup you have!
Lightning Performance
Here For The Long Haul!
- Local time
- 2:02 AM
- User ID
- 677
- Joined
- Jan 26, 2016
- Messages
- 10,991
- Reaction score
- 28,050
- Location
- East of Philly
@flying pig Nice simple setup.
So far I think yours is the simplest adjustable width setup I have yet to see. Can it be pulled with a hand crank winch?
Very very interested to have that on mine.
So far I think yours is the simplest adjustable width setup I have yet to see. Can it be pulled with a hand crank winch?
Very very interested to have that on mine.
Lightning Performance
Here For The Long Haul!
- Local time
- 2:02 AM
- User ID
- 677
- Joined
- Jan 26, 2016
- Messages
- 10,991
- Reaction score
- 28,050
- Location
- East of Philly
Any videos of these mills in action? A walk around video showing close ups would be great!
Hammered
Well-Known OPE Member
- Local time
- 12:02 AM
- User ID
- 1830
- Joined
- Sep 9, 2016
- Messages
- 76
- Reaction score
- 240
- Location
- Costa rica
I would really like to know more about running the open clutch mode flying pig.
Does it help cool the clutch and how about chain lube?
I find my cover is jammed packed with crud and I think this affects the lubrication on the chain.
most of it rubs off as it goes through the crud pack in the cover if I don't clean it every hr.
Does it help cool the clutch and how about chain lube?
I find my cover is jammed packed with crud and I think this affects the lubrication on the chain.
most of it rubs off as it goes through the crud pack in the cover if I don't clean it every hr.
flying pig
Super OPE Member
- Local time
- 12:02 AM
- User ID
- 1563
- Joined
- Jul 17, 2016
- Messages
- 295
- Reaction score
- 1,006
- Location
- Grande Prairie, Alberta
I did the open clutch side mod mostly for heat. These saws were designed for falling and heavy bucking, not as sawmills. Ha ha. The clutch on a 2100 will swell enough that it stays engaged after a hard pull more than a few minutes in length. After I pulled this cover off it no longer stays engaged which tells me it must be running much cooler. As a bonus it gets rid of chips much better too.
Hammered
Well-Known OPE Member
- Local time
- 12:02 AM
- User ID
- 1830
- Joined
- Sep 9, 2016
- Messages
- 76
- Reaction score
- 240
- Location
- Costa rica
I did the open clutch side mod mostly for heat. These saws were designed for falling and heavy bucking, not as sawmills. Ha ha. The clutch on a 2100 will swell enough that it stays engaged after a hard pull more than a few minutes in length. After I pulled this cover off it no longer stays engaged which tells me it must be running much cooler. As a bonus it gets rid of chips much better too.
Thanks for the tip.
I'm going to make up an adapter plate with tensor this morning and try this out.
It makes sence to do this mod.