High Quality Chainsaw Bars Husqvarna Toys

My new BIY sawmill and rail bed.

J & L Creations

Machine Design
Local time
11:25 AM
User ID
1100
Joined
Mar 31, 2016
Messages
264
Reaction score
646
Location
Texas
This last 4 day weekend was a workout for an old man like me, but I got through it. Almost completed the welding on my 24' sawmill rail, still a few things left to do on the band saw part of the mill, then I can install the log stops on the rail. After all this is complete, I'll be taking the saw apart, sand blasting, painting then reassembling to completion. I plan on a video of the build as I built it all. Here's, the rail as we left it Monday evening.
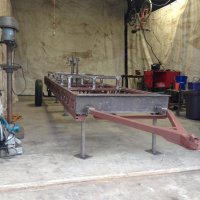
Rail 3.jpg
 
Last edited:

J & L Creations

Machine Design
Local time
11:25 AM
User ID
1100
Joined
Mar 31, 2016
Messages
264
Reaction score
646
Location
Texas
Thanks guy's, I really hope to be done completely by the end of this month or early in July.
 

J & L Creations

Machine Design
Local time
11:25 AM
User ID
1100
Joined
Mar 31, 2016
Messages
264
Reaction score
646
Location
Texas
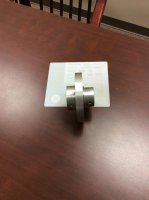
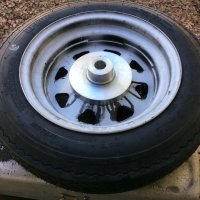
Thanks guy's, looks like I'm not going to be able to work on it for a couple of weeks. I would like to have more time to work on it but things just keep getting in the way. The next hard push to finish will be soon though, I really want to finish this sawmill so I can start making/building things. Here is a hub I cast in aluminum early on in the build, then machined on the lathe.

Hub.jpg
Hub in wheel.jpg
 

exSW

'Cause Thomas is a poopyhead
Local time
12:25 PM
User ID
109
Joined
Dec 23, 2015
Messages
5,072
Reaction score
16,690
Location
United States
Country flag
This reminds me of my friend that built a frame machine for hearses,limos and one ton extended cab trucks cause they didn't make one that big at the time.
 

J & L Creations

Machine Design
Local time
11:25 AM
User ID
1100
Joined
Mar 31, 2016
Messages
264
Reaction score
646
Location
Texas
Just wanted to mention if anyone needs information on building a band sawmill, I'll be glad to help or tell what I know. I have learned from my mistakes, or mistakes from others and went through all the guess work so you won't have to. Pulleys and gear ratio's, leads screws, FPM of the bandsaw blade, what band saw blade to use and where to buy them. There is allot of technical and common since information needed to succeed in building a good working sawmill. I did view many YT videos before I started to build mine, did not find many people willing to help either. But with all of this the proof will be how my sawmill will perform once it is finished and first cuts, which I expect to be spot on, we will see. I have not totaled cost to build this sawmill yet as I have traded some spent some and been given some materials for the build.
 

Redfin

Meh...
Local time
12:25 PM
User ID
159
Joined
Dec 24, 2015
Messages
7,645
Reaction score
39,981
Location
Central Pa
Country flag
Thanks guy's, looks like I'm not going to be able to work on it for a couple of weeks. I would like to have more time to work on it but things just keep getting in the way. The next hard push to finish will be soon though, I really want to finish this sawmill so I can start making/building things. Here is a hub I cast in aluminum early on in the build, then machined on the lathe.

View attachment 23785
View attachment 23786
Nice.
 

J & L Creations

Machine Design
Local time
11:25 AM
User ID
1100
Joined
Mar 31, 2016
Messages
264
Reaction score
646
Location
Texas
Ok guys, here is an update on the saw mill. My partner and I worked on the sawmill this last week, 5 long hot days, July 4th through to July the 8th 2016. Took a vacation week. All the fabrication is done to the rail bed and the sawmill itself. Am now in the sandblasting and priming stages of the build. To stay in the shade a bit we first had to build a temporary awning of sorts, then set up a 60 gallon 3 cylinder compressor, built an air dryer out of 4" x 12' and 4" x 7' square tubing, with a 2" x 3' long pipe as a crossover on the top end of both tubes, a filter within, all welded together. Welded tops and bottoms of the square tubing with 1/4" plate steel to plug them off. Drilled and cut 3/4" pipe threads in the plate steel at the bottom end for drains and a few in the side of the two lengths of square tubing for air input and output. Now we have about an 80 or so gallon capacity of air volume. All of that is finished as well, so we can now sandblast and paint with dry air, it works oh so well. I hope to and expect to have the sawmill up and running by the end of the month, if all goes well. More to come when the sawmill has been completed with first cuts video.
 

Redfin

Meh...
Local time
12:25 PM
User ID
159
Joined
Dec 24, 2015
Messages
7,645
Reaction score
39,981
Location
Central Pa
Country flag
What is the filter media in the crossover of the dryer. Any specific reason you chose to place dryer after the tank?
 

J & L Creations

Machine Design
Local time
11:25 AM
User ID
1100
Joined
Mar 31, 2016
Messages
264
Reaction score
646
Location
Texas
What is the filter media in the crossover of the dryer. Any specific reason you chose to place dryer after the tank?

Hello Redfin, the filter material was made from a dense 1" thick A/C filter, was rolled up tight and pressed into the cross over pipe, with a small rod welded inside the pipe vertically to hold the filter material from sliding out of the pipe under pressure. Was able to keep the pipe cool enough as the welding was being done with wet rags. The 60 gallon compressor tank has a ball valve drain at the very bottom of the tank so we can drain water there. The manifold dryer we built was designed with the 12' square tube as the input from the 60 gallon tank. This longer square tube (12') made all the difference in having enough area to cool and condense the hot air and water vapor from the 60 gallon tank, the cross over pipe and the 7' square tube don't see much water vapor, what ever condensed water does make it through falls to the bottom of the (7') shorter square tube, we just open the drain a couple of seconds and that's all it takes for the water to drain out. We never see water coming out of our hoses or sandblasting gun now, before we built this dryer sandblasting used to be a huge problem with mud plugging up the gun every 10 minutes. We can sandblast all day without cleaning the gun now.
 
Last edited:

Redfin

Meh...
Local time
12:25 PM
User ID
159
Joined
Dec 24, 2015
Messages
7,645
Reaction score
39,981
Location
Central Pa
Country flag
Cool to see different ways of doing things. Using the cfm you are during sand blasting it probably doesnt matter which comes first, dryer or tank.

The only reason I ask was I normally see the dryer plumbed before the tank so the moist air can be dried before storage.
 
Top