High Quality Chainsaw Bars Husqvarna Toys

McCulloch Super Pro 125c build thread

jacob j.

Lord of Cargo Pants
GoldMember
Local time
10:52 PM
User ID
232
Joined
Dec 24, 2015
Messages
8,933
Reaction score
62,229
Location
Coastal Oregon
Country flag
Great write up JJ! Dose that cp block have any number on it? Been curious about that! What muffler did your dad like on the 101?

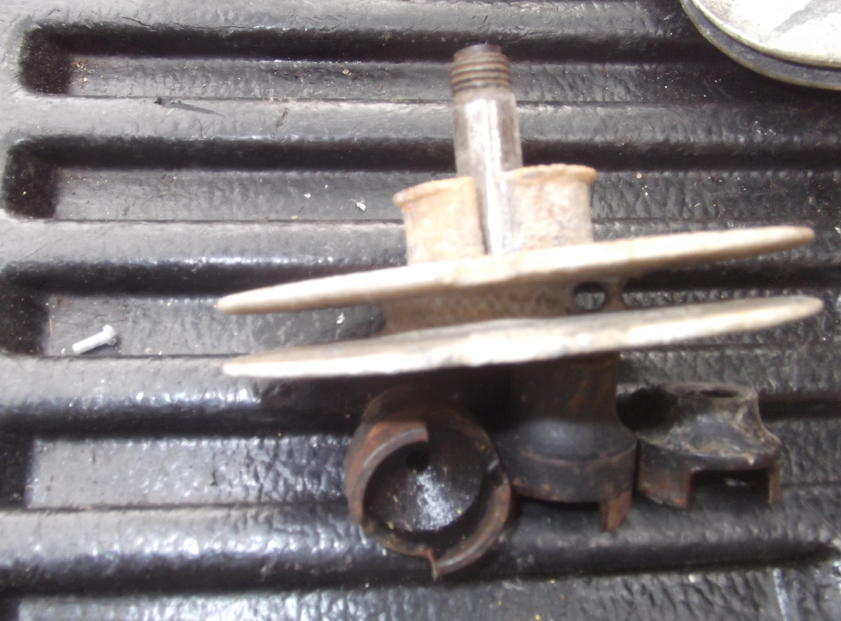
I am running the 125 crank in my sdc saw, because of mcbob! I have two welded style cranks, one was a cp crank and the other was a 101aa, after seeing so may counter weight issues, I think I will have a buddy fussion Tig the counterweights to have some more insurance!
Looks like maybe a early boost port CP block Jacob? Thanks for sharing this stuff on your dads saw. This is pretty much how my build is going to be.
I think it’s the late style, replacement block, That’s why I’m curious about the numbers

I think it's a late replacement block myself - it has no numbers on it of any kind and I bought a NOS 797 block off ebay a few years ago that is similar. It has the boost port area cast-in but the sleeve
isn't cut for the boost ports. I think my dad put this saw together around '73. I know he bought the 101b engine when it first came out in '74 and had Rich build it straight away and that was his
favorite saw by far. The other SP he built later, probably around '76-77. Before that he was running the straight CP-125s. When he first went to work in the woods ('67 or so), he was running the 100cc Pioneers.
 

jacob j.

Lord of Cargo Pants
GoldMember
Local time
10:52 PM
User ID
232
Joined
Dec 24, 2015
Messages
8,933
Reaction score
62,229
Location
Coastal Oregon
Country flag
Just as a note, it looks like a 3/8 reach plug was ran in that head for a while? Some kart head were made for 3/8 reach plug and some 1/2. I have both styles the 1/2 reach plug only comes in a longer body, the karts recoil cove is cut different and has a different boot, you can modify the saw cover if desired

Very cool Nathan - I don't know as much about the kart motors. This one didn't have a plug in it when I got it but it likely had the shorter plug in it when it was in the woods. When I got this stuff, it was in my dad's shop
and had an inch-thick layer of dust on it. I got this junk around '94 because I was the only member of the family to show any interest in it. I've been dragging it around all this time.

There was still a mint SP-80 there too but my cousins were using it to run a Lewis winch when they went Elk hunting.
 

Bigmac

Mastermind Approved!
Local time
10:52 PM
User ID
5937
Joined
Apr 19, 2018
Messages
5,436
Reaction score
37,561
Location
Oregon
Country flag
I think it's a late replacement block myself - it has no numbers on it of any kind and I bought a NOS 797 block off ebay a few years ago that is similar. It has the boost port area cast-in but the sleeve
isn't cut for the boost ports. I think my dad put this saw together around '73. I know he bought the 101b engine when it first came out in '74 and had Rich build it straight away and that was his
favorite saw by far. The other SP he built later, probably around '76-77. Before that he was running the straight CP-125s. When he first went to work in the woods ('67 or so), he was running the 100cc Pioneers.
That’s some great history! I haven’t had one of those blocks in my hands, but knowing that they didn’t put the 101 boost port humps into the 101 blocks tell later and the early blocks has the old mc101 style boost port I figured it had to be late or replacement, my 797 has an unpainted finish, and the numbers on the block look almost hand done, I think it’s a replacement block too, I has the right numbers, and the boost port, it’s just weird! Lol
 

Bigmac

Mastermind Approved!
Local time
10:52 PM
User ID
5937
Joined
Apr 19, 2018
Messages
5,436
Reaction score
37,561
Location
Oregon
Country flag
Very cool Nathan - I don't know as much about the kart motors. This one didn't have a plug in it when I got it but it likely had the shorter plug in it when it was in the woods. When I got this stuff, it was in my dad's shop
and had an inch-thick layer of dust on it. I got this junk around '94 because I was the only member of the family to show any interest in it. I've been dragging it around all this time.

There was still a mint SP-80 there too but my cousins were using it to run a Lewis winch when they went Elk hunting.
Thanks Jacob, I am still learning stuff all the time on these macs, so much info is lost or not available, I have been trying to find a short body plug for the 1/2 reach and is just doesn’t seem to be available! The long body doesn’t fit well and is almost impossible to remove with the stock saw recoil cover. I have asked around and on most forums they all seem to run a 3/8 reach plug! Terry says just run a 9 heat range 1/2 reach, but you really need to modify the stock cover and run a kart boot. Just kinda throwing that info out, it taken me a while to find all that out! Lol

I am glad you saved this “junk”!!!! 94 is a long time to pack it around...but it super cool now!
 

Al Smith

Here For The Long Haul!
Local time
1:52 AM
User ID
537
Joined
Jan 14, 2016
Messages
6,117
Reaction score
13,512
Location
North western Ohio
Country flag
If it's been in service a long time already then it may have congealed
oil in the pores and won't rust too bad.

A comment .Cast iron cylinders have the ability to in effect transfer the carbon of combustion to adhere to the cylinder almost creating a plating on it filling in voids .I've seen this on old tractor engines .How much this strange effect might work or be present on two cycle engines I don't know but I doubt it would happen on plated cylinders only iron.
I rebuilt the engine on a cat D4,1943 that had damage in the top of one cylinder .I cleaned it out the best I could and reassembled it and ran it for 5-6 years until a prechamber went bad .In removing the cylinder head that cylinder looked as smooth as the other three .
 

jacob j.

Lord of Cargo Pants
GoldMember
Local time
10:52 PM
User ID
232
Joined
Dec 24, 2015
Messages
8,933
Reaction score
62,229
Location
Coastal Oregon
Country flag
I got to do a little more with the 125 I built a few posts back in this thread - I was playing around with it last weekend and wanted to try a hotter plug. As I was cinching the new plug down,
I got the wonderful feeling of the plug threads giving away. So, the saw had to come apart for a time-sert repair (that's the price of working on old saws).

Now, with a time-sert repair and a hotter plug - this one is running great. It's just a fun saw to run and bigger wood is definitely where it's at with these 125s (even a stock one).


NPKenny

Super OPE Member
Local time
10:52 PM
User ID
5030
Joined
Jan 12, 2018
Messages
292
Reaction score
741
Location
Lehi, AZ
Country flag
I got the wonderful feeling of the plug threads giving away. So, the saw had to come apart for a time-sert repair (that's the price of working on old saws).

A 6mm tap was the most important tool on my recent 075AV build!!!! Many 5mm fasteners are now 6mm’s with a generous amount of blue loctite.

I don’t suppose you have a shot of the finished time-sert in the plug location?
 

jacob j.

Lord of Cargo Pants
GoldMember
Local time
10:52 PM
User ID
232
Joined
Dec 24, 2015
Messages
8,933
Reaction score
62,229
Location
Coastal Oregon
Country flag
A 6mm tap was the most important tool on my recent 075AV build!!!! Many 5mm fasteners are now 6mm’s with a generous amount of blue loctite.

I don’t suppose you have a shot of the finished time-sert in the plug location?

I does indeed - I follow the video on Time-serts done by mweba which is about the best tutorial I've ever seen. I mix up a small amount of JB Weld and coat the insert with it. I set it just under flush with the mounting edge on
the cylinder (you want the plug seating against the body of the cylinder, not the insert). Then I give it one or two good raps with the setting tool.

 
Last edited:

jacob j.

Lord of Cargo Pants
GoldMember
Local time
10:52 PM
User ID
232
Joined
Dec 24, 2015
Messages
8,933
Reaction score
62,229
Location
Coastal Oregon
Country flag
Continuing on - I'm re-furbishing some Mac large-frame starters today. Getting these apart is a pain in the ass. The housing is a two-piece, with the rope rotor connecting to the mounting
base via an integrated shaft that has left-hand thread for the ferrule that engages the starting pawls on the flywheel. Usually, to clean these real good, you need to get them all apart.

On the upper right, you can see starter covers with the new-style logo (cover next to the can of Kroil) and old-style logo (cover on the far right).

 
Last edited:

jacob j.

Lord of Cargo Pants
GoldMember
Local time
10:52 PM
User ID
232
Joined
Dec 24, 2015
Messages
8,933
Reaction score
62,229
Location
Coastal Oregon
Country flag
How the rope hooks to the rotor is kind of ingenious - There's a loop cast into the inside of the rope rotor that the rope passes through, and then the end of rope is melted and a small
tin rivet is worked through the end of rope, holding it in place.


jacob j.

Lord of Cargo Pants
GoldMember
Local time
10:52 PM
User ID
232
Joined
Dec 24, 2015
Messages
8,933
Reaction score
62,229
Location
Coastal Oregon
Country flag
Here you can see detail on the inside of the starter base indicating that the ferrule needs to be turned clockwise in order to get it off. Shooting some Kroil into the
hole is very help as the ferrule is usually glued on there with Red Loctite.

 
Last edited:

jacob j.

Lord of Cargo Pants
GoldMember
Local time
10:52 PM
User ID
232
Joined
Dec 24, 2015
Messages
8,933
Reaction score
62,229
Location
Coastal Oregon
Country flag
I then clamp the portion of the rope rotor that sticks out in my vise with some rags to keep from damaging it and use a large steel bar to slowly screw the ferrule off the rope rotor.

As you can see on the one starter base below, it uses a nylon bushing for the shaft of the rope rotor. I think the later design uses a brass bushing.


jacob j.

Lord of Cargo Pants
GoldMember
Local time
10:52 PM
User ID
232
Joined
Dec 24, 2015
Messages
8,933
Reaction score
62,229
Location
Coastal Oregon
Country flag
The condition of the starter inside really depends on the conditions it was run in and if the operator lubricated it regularly with some sort of dry lube. My dad was a firm
believer in lubricating starters with powdered graphite, which I believe in also. The powdered graphite doesn't attract dirt like "wet" lubricants do.

Also at the upper right you can see long and short ferrules - the short ones are used on the non-Super series engines like the 1-43, 1-52, 250, 380, etc. The long ferrule normally comes on the Super series motors (101, 125, 795, 797 - etc.). There's also different thickness shrouds which accommodate the short or long reach ferrules.

 
Top