High Quality Chainsaw Bars Husqvarna Toys

Husqvarna 350/346 Repair Thread.

Onan18

OPE Sponsor
GoldMember
Local time
3:33 PM
User ID
344
Joined
Dec 30, 2015
Messages
4,444
Reaction score
24,735
Location
Georgia
Country flag
There is a nice upgrade for this chassis, you can use a clutch cover from a 455/460 and have a much nicer and easier to use chain tensioner. Shown is a 359 but the procedure is almost exactly the same for the smaller saws.

20180504_164720-jpg.123615

Remove the old cover.

20180504_164827-jpg.123617

Spin the clutch off, left hand thread.

20180504_164836-jpg.123618

Remove the drum and wind the worm gear out.

20180504_164859-jpg.123619

Here is the only difference in procedure. The 357/359 has two screws that hold the bar pad plate on, the smaller saws only have the one close to the bar studs.

20180504_164931-jpg.123621

It needs to be removed to access the old tensioner
 
Last edited:

Onan18

OPE Sponsor
GoldMember
Local time
3:33 PM
User ID
344
Joined
Dec 30, 2015
Messages
4,444
Reaction score
24,735
Location
Georgia
Country flag
20180504_164936-jpg.123622

Remove the old tensioner and discard it.

20180504_165000-jpg.123623

Reinstall the bar pad plate and wind the worm gear in.

20180504_165037-jpg.123624

Drop the needle bearing and clutch drum back on.

20180504_165059-jpg.123625

Grease the bearing.

20180504_165129-jpg.123626

And spin the clutch back on.
 

Tor R

Newbie
GoldMember
Local time
9:33 PM
User ID
439
Joined
Jan 8, 2016
Messages
5,155
Reaction score
33,170
Location
Mandal, Norway
Country flag
There is a nice upgrade for this chassis, you can use a clutch cover from a 455/460 and have a much nicer and easier to use chain tensioner. Shown is a 359 but the procedure is almost exactly the same for the smaller saws.

20180504_164720-jpg.123615

Remove the old cover.

20180504_164827-jpg.123617

Spin the clutch off, left hand thread.

20180504_164836-jpg.123618

Remove the drum and wind the worm gear out.

20180504_164859-jpg.123619

Here is the only difference in procedure. The 357/359 has two screws that hold the bar pad plate on, the smaller saws only have the one close to the bar studs.

20180504_164931-jpg.123621

It needs to be removed to access the old tensioner

20180504_164936-jpg.123622

Remove the old tensioner and discard it.

20180504_165000-jpg.123623

Reinstall the bar pad plate and wind the worm gear in.

20180504_165037-jpg.123624

Drop the needle bearing and clutch drum back on.

20180504_165059-jpg.123625

Grease the bearing.

20180504_165129-jpg.123626

And spin the clutch back on.

20180504_165137-jpg.123628

Clutch cover from a 455.

20180504_165141-jpg.123629

Much more user friendly tensioner setup.

20180504_165432-jpg.123630

And done.
Awesome post and description, thanks Joe!
 

Tor R

Newbie
GoldMember
Local time
9:33 PM
User ID
439
Joined
Jan 8, 2016
Messages
5,155
Reaction score
33,170
Location
Mandal, Norway
Country flag
XPG build

First we need to start with the rear element:
_DSC4667.jpg

Drill out those two holes:
_DSC4668.jpg

Second, we need to cut out this square area also:
_DSC4669.jpg

Time to mount the rear heat element:
_DSC4670.jpg

Let both wires goes down through the trottle area, there is enough space to get the wires up after the heat element is in place.
_DSC4671.jpg
 

Tor R

Newbie
GoldMember
Local time
9:33 PM
User ID
439
Joined
Jan 8, 2016
Messages
5,155
Reaction score
33,170
Location
Mandal, Norway
Country flag
Fuel tank with rear heat element is done (the red wire to the front handle bar is attached in an eye in the fuel tank):
_DSC4672.jpg

Generator:
_DSC4676.jpg

Saw start to get together, generator wire + rear heat element goes through the same eye:
_DSC4678.jpg

Cable protector mounted:
_DSC4679.jpg

Grounding for the XPG system:
_DSC4681.jpg
 

Onan18

OPE Sponsor
GoldMember
Local time
3:33 PM
User ID
344
Joined
Dec 30, 2015
Messages
4,444
Reaction score
24,735
Location
Georgia
Country flag
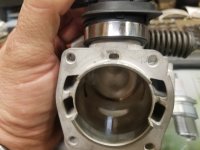
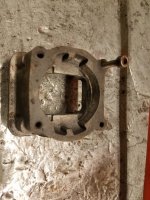
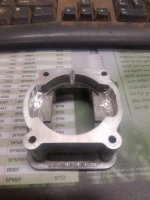
The 346 cylinder draws pulse signal from a different place than the 350 cylinders. In order for it to work the bearing cup has to be modified.

20181026_135303.jpg
346 cylinder, notice the pulse passage in the center on the top.

20181026_180711.jpg
Stock bearing holder, if you just bolt the cylinder down your carb will get no signal.

20181026_123452.jpg
Modified bearing holder, all that is really necessary is to grind in the notch in the center. But while you have the burrs out anyways...
 

Onan18

OPE Sponsor
GoldMember
Local time
3:33 PM
User ID
344
Joined
Dec 30, 2015
Messages
4,444
Reaction score
24,735
Location
Georgia
Country flag
20181026_125425.jpg
On the 346 cylinder the transfer bulges are wider than on the 350 cylinders.

20181026_135248.jpg
On the PTO side you have to grind them down a bit or they will interfere with the case.

Other than this it is pretty much plug and play.
 

Fishnuts2

Here For The Long Haul!
GoldMember
Local time
2:33 PM
User ID
284
Joined
Dec 28, 2015
Messages
1,024
Reaction score
5,947
Location
SE MN
Country flag
I think your threads are extremely helpful! And, a whole lot faster way to gain knowledge on a particular saw. You get to the point that you're trying to make with very few words, and provide awesome pictures to go with it so it's easy to go back and study if needed. I couldn't ask for more.
Thanks so much!
 

J. Dirt

Super OPE Member
Local time
3:33 PM
User ID
6409
Joined
Jun 13, 2018
Messages
376
Reaction score
1,028
Location
WNY
Country flag
The 346 cylinder draws pulse signal from a different place than the 350 cylinders. In order for it to work the bearing cup has to be modified.

View attachment 147335
346 cylinder, notice the pulse passage in the center on the top.

View attachment 147333
Stock bearing holder, if you just bolt the cylinder down your carb will get no signal.

View attachment 147334
Modified bearing holder, all that is really necessary is to grind in the notch in the center. But while you have the burrs out anyways...
I thought that riser piece wasn’t needed on a 350 to 346 conversion?
 

J. Dirt

Super OPE Member
Local time
3:33 PM
User ID
6409
Joined
Jun 13, 2018
Messages
376
Reaction score
1,028
Location
WNY
Country flag
Got it! Did some re reading earlier and looked at the pics closer, now I got it!
 

PogoInTheWoods

Pinnacle OPE Member
Local time
3:33 PM
User ID
1190
Joined
Apr 23, 2016
Messages
1,943
Reaction score
3,850
Location
Ohio
Country flag
Bumping this thread for some opinions on bearing and seal replacement options for these saws. The OEM pricing is simply unacceptable by anyone's standards (except a Husky dealer, of course) and the SKF's I see on ebay are even worse! Anyone have any good, bad, or upside down experience going the aftermarket route? I could go with Nachi 6202 C3's at around 5 or 6 bux each, but what about the aftermarket seals? Are they all basically from the same Asian source? I did read a review indicating fitment issues...

And I just saw Matt's vid about installing the bearings into the seal/retainer with a hammer and a couple of sockets. Seems like a nut and bolt (or c-clamp) and a pair of washers to draw the bearing into the retainer would be easier and less apt to deform it as could possibly be the case by a glancing blow from a hammer cocking the bearing on the way in..., or worse. Any preferred methods by those of you who've had success buying the bearings and seals separately?

Tia for any input or enlightenment.
 
Top