Wagnerwerks
I have yet to "suffer" from CAD
I just realized this may be old news, but it's new to me...lol
So I came up with something today and I think it's worth sharing. While I was working, I was trying to decide how to cut my squish band in one of my 27 or so current saw projects. The base on this one was easy as it has a flat bottom. The inside was a bit more complex. I know sanding them works well, but it takes a while and I'm not patient sometimes. I came up with this little apparatus. All I used was a sawzall, an old sawzall blade, epoxy, a grinder, and a worn out piston.
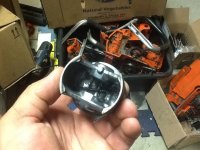
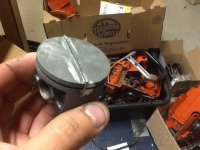
First I cut a slot through the top of the piston. I then cut a chunk of saw blade that was a little big in the slot and stuck out the top an 1/8 or so of an inch. Then epoxy the inside and out to glue the blade in the slot. After the epoxy dries, carefully grind the blade nice and flat with most of the 1/8" still remaining. Also grind the edges flush with the piston. After it looks nice and tidy, bevel the blade on the grinder ( I used my chain grinder because is has a nice thin wheel. ) so it makes a "cutting edge" going opposing directions on the top. (Hopefully the pic will explain better than me.). I used a chisel in the bottom of the piston to turn it and cut the band. It's crazy quick and looks great. Here's some pics.
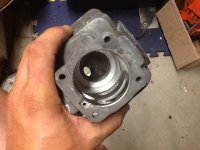
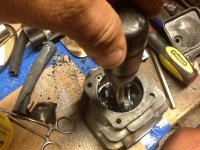
So I came up with something today and I think it's worth sharing. While I was working, I was trying to decide how to cut my squish band in one of my 27 or so current saw projects. The base on this one was easy as it has a flat bottom. The inside was a bit more complex. I know sanding them works well, but it takes a while and I'm not patient sometimes. I came up with this little apparatus. All I used was a sawzall, an old sawzall blade, epoxy, a grinder, and a worn out piston.
First I cut a slot through the top of the piston. I then cut a chunk of saw blade that was a little big in the slot and stuck out the top an 1/8 or so of an inch. Then epoxy the inside and out to glue the blade in the slot. After the epoxy dries, carefully grind the blade nice and flat with most of the 1/8" still remaining. Also grind the edges flush with the piston. After it looks nice and tidy, bevel the blade on the grinder ( I used my chain grinder because is has a nice thin wheel. ) so it makes a "cutting edge" going opposing directions on the top. (Hopefully the pic will explain better than me.). I used a chisel in the bottom of the piston to turn it and cut the band. It's crazy quick and looks great. Here's some pics.
Attachments
Last edited: