High Quality Chainsaw Bars Husqvarna Toys

Any Constructive criticism? Pics.

Stihlmar

Well-Known OPE Member
Local time
9:01 PM
User ID
4455
Joined
Oct 26, 2017
Messages
50
Reaction score
97
Location
Tipton, IA
Been playing around with some of grandpas tools and machines that I would love to have.... “maybe someday” he says.

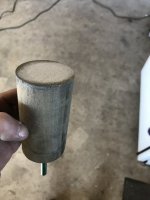
Had some time to tinker and have made a few parts and pieces to do the all mighty port job. Not sure if anything I have made or done will work? Just buying Chinese parts and playing around with them.

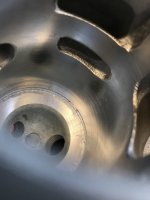
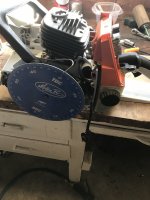
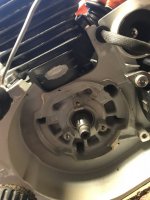
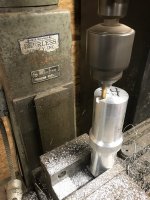
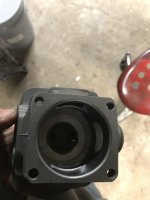
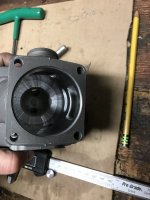
So my biggest question is on the mandrel cutter. Mine seemed to work. I took roughly .03 out of the cylinder. Just seemed to really chatter or gouge while cutting and I think you can see it. It’s no where near as smooth as what I have seen. I did not sand at all just kept turning. Haven’t made one of those yet. I also didn’t cut a relief for the chips. Just the first attempt.

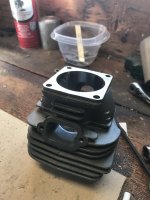
So how do you put an edge on the HSS? Roughly what degrees? Would like a better finish just not sure how to achieve it. Mine cut like hell with little pressure. To start Jug was very rough in the squish band and had typical Chinese quality.
 

Attachments

  • 6B894A21-062D-4BC0-B808-A6BC86C08491.jpeg
    6B894A21-062D-4BC0-B808-A6BC86C08491.jpeg
    167 KB · Views: 254
  • 68F5C000-423C-4B8D-804A-756C7055499D.jpeg
    68F5C000-423C-4B8D-804A-756C7055499D.jpeg
    69.7 KB · Views: 266
  • 0BF0C550-03F3-4558-9C54-CD33C4A520DF.jpeg
    0BF0C550-03F3-4558-9C54-CD33C4A520DF.jpeg
    108.4 KB · Views: 274
  • 8C686FB4-D900-4019-93DD-DE47F936FE74.jpeg
    8C686FB4-D900-4019-93DD-DE47F936FE74.jpeg
    103 KB · Views: 270
  • 91414BC9-353D-4564-B1F6-145316E213E6.jpeg
    91414BC9-353D-4564-B1F6-145316E213E6.jpeg
    154.3 KB · Views: 233

Chainsaw Jim

Con Artist LLC
Local time
7:01 PM
User ID
836
Joined
Feb 8, 2016
Messages
4,014
Reaction score
79
Location
Springfield Oregon
Maybe make the cutter extend all the way across the mandrel so it cuts on both sides for better balance...even better if you can make it four way. Make sure the edge is sharp and apply less pressure with quick turns. Clean the edges frequently.
You can angle the cutters a little bit to eliminate the chatter marks.
 

Wilhelm

Here For The Long Haul!
GoldMember
Local time
4:01 AM
User ID
1204
Joined
Apr 28, 2016
Messages
11,537
Reaction score
43,891
Location
Croatia
Country flag
My humble opinion working with drills on a daily basis:
- the chips have nowhere to flow
- the "blade" has a too dull cutter geometry
- the blade is cutting one sided thus taking uneven bite while rotating (like said by @Chainsaw Jim )

I note that I have never tried/used a setup like Yours, thus my opinions may not apply to this application!

This is how a factory new Tungsten Carbide drill blade is sharpened, this might be a little bit too aggressive for Your application.
DSC06122.JPG

For comparison this is a factory new HSS drill, it has more shoulder which acts as a depth limiter and makes the cutter less aggressive.
DSC06139.JPG

I'd try what Jim suggested, make a longer cutter so it takes of material both sides.
If You keep the cutter single sided, make it protrude less!
 

Red97

Mastermind Approved!
GoldMember
Local time
10:01 PM
User ID
385
Joined
Jan 2, 2016
Messages
7,452
Reaction score
53,849
Location
MI
Country flag
You are always going to get some chatter nature of the beast. Should be slightly undersize so you can apply side pressure while rotating. Slightly overboring the diameter, while still being able to remove the cutter without gouging the walls.

Trim a bit off the top of your mandrel, recut the slot at a 3-5* leaned back angle.

That way the leading edge is highest, then you can use the hss bit as is.

Once you get the chatter it needs to be sanded, otherwise ya ride up on the high spots and dig into the low worsening the chatter.

Make the sanding mandrel a snug fit. I like to use wood. Attach to a drill and clean it up with 80 - 150 grit. This will smooth out/square up the band.

You may have to go back in and take a light cut to enlarge the od after sanding.
 

drf256

Dr. Richard Cranium
GoldMember
Local time
10:01 PM
User ID
319
Joined
Dec 29, 2015
Messages
9,357
Reaction score
61,535
Location
Strong Island NY
Country flag
Like Joe said above.

I used to cut with a mandrel.

Lean cutter back 3*. I never left a place for chips and it worked fine.

Cut a piece of pvc pipe to fit over your mandrel. Slot it. Put a hose clamp around it. Then use a feeler guage after you put jug on and undersize what u wanna cut by .005. Get pvc lined up with feeler guage and tighten clamp. Now you have a stop, and chatter will be minimized.

Like Joe said, chatter is inherent to cutting with a mandrel. Once you get it, it’s only gonna get worse unless you sand it.

You can remove your tool and put sticky back paper right on your mandrel to sand if needed.

And scrape the edge of the band, where it hits the bore, with a sharp wood chisel. It works.
 

Stihlmar

Well-Known OPE Member
Local time
9:01 PM
User ID
4455
Joined
Oct 26, 2017
Messages
50
Reaction score
97
Location
Tipton, IA
Thanks everybody. When you are cutting the slot at a angle for the cutter, are you not putting an edge on the hss at all? Right out of the box to the mandrel and go?
 

Red97

Mastermind Approved!
GoldMember
Local time
10:01 PM
User ID
385
Joined
Jan 2, 2016
Messages
7,452
Reaction score
53,849
Location
MI
Country flag
Thanks everybody. When you are cutting the slot at a angle for the cutter, are you not putting an edge on the hss at all? Right out of the box to the mandrel and go?
No need, the leading (square edge) will be up doing the cutting.

The factory shape works fine on most. You may have to add some relief. If you start with a completely square bit.
To make sure you just have the cutting point stick out the furthest.
 
Last edited:

Stihlmar

Well-Known OPE Member
Local time
9:01 PM
User ID
4455
Joined
Oct 26, 2017
Messages
50
Reaction score
97
Location
Tipton, IA
I made a very quick but effective sanding block. Crude but did remove and flatten band considerably.

Now that the bad high spots are out of the band I will rework mandrel to cut better. But what I have is what looks like a few pieces of alum. In the gap between existing bore and new cut area. I think you can see it in the picture directly below the right corner of the transfer.

This typical or was it something I did, which is very very possible.
 

Attachments

  • 27937C02-A870-4555-A9B8-C743E1A98F9F.jpeg
    27937C02-A870-4555-A9B8-C743E1A98F9F.jpeg
    84.4 KB · Views: 127
  • 0DAA2E42-D8C1-42C3-9900-BD98AC9B8BF9.jpeg
    0DAA2E42-D8C1-42C3-9900-BD98AC9B8BF9.jpeg
    82.7 KB · Views: 123
  • 30000010-3B31-4838-8B64-BAFA7ABF6FB1.jpeg
    30000010-3B31-4838-8B64-BAFA7ABF6FB1.jpeg
    137 KB · Views: 117

huskihl

Muh fingers look really big
GoldMember
Local time
10:01 PM
User ID
360
Joined
Dec 31, 2015
Messages
22,532
Reaction score
143,408
Location
East Jordan, MI
Country flag
I used to do it by hand also. Basically, I'd get the same chatter. The sanding mandrel cleaned up the chatter marks and kept the band square to the bore. The cutter is needed to get the very edge, but it also helps with bulk removal. I always went 2 spins with the cutting mandrel, and then a few seconds with the sanding mandrel and drill. Gotta keep the sandpaper sharp
 

Derf

Pinnacle OPE Member
Local time
10:01 PM
User ID
526
Joined
Jan 13, 2016
Messages
736
Reaction score
2,643
Location
Long Island NY
Country flag
Scott (@Treemonkey) used to use a mandrel and hss cutter like yours. Chatter is normal. Following up with sandpaper stuck to the top of another mandrel smooths the squish band out.
Looks like you aren’t sanding right to the edge of the cylinder. Or, hss cutter isn’t right to edge of mandrel. Or, it is just the exposed aluminum on the newly cut wall above the nikasil plating on the side wall. Hard to tell from the picture. How much did you take out?
 

Stihlmar

Well-Known OPE Member
Local time
9:01 PM
User ID
4455
Joined
Oct 26, 2017
Messages
50
Reaction score
97
Location
Tipton, IA
After cutting and sanding to get a better finish I ended up with .050 out. It does look odd and I questioned it but when I lay card stock in it and slide it up it doesn’t catch and the piston goes all the way to the band.

Now to cut he base.... should I just cut enough off the base to cut squish back to .02?
 

Stihlmar

Well-Known OPE Member
Local time
9:01 PM
User ID
4455
Joined
Oct 26, 2017
Messages
50
Reaction score
97
Location
Tipton, IA
I ended up cutting the base to get squish as close as I could. I just put the wheel on and timed it up.

I never bolted this new jug down to time it. Just started cutting it.

Removed .05 from the band and bolted it down to check squish. Had roughly .085. Took .06 off the base. Squish now is at .023

My numbers are 102/132/87

Bring transfers up to 122? Leave intake alone? Seems like a lot? I don’t really know what I’m doing lol just enjoy it. Nothing to prove here!

Had to clearance the case a lot and even the flywheel side of the jug because of the flywheel. Didn’t want to bother with flywheel because I don’t know if this jug will even run or last. This is all on a clone BTW. I would NOT be doing this on a good 660!
 

drf256

Dr. Richard Cranium
GoldMember
Local time
10:01 PM
User ID
319
Joined
Dec 29, 2015
Messages
9,357
Reaction score
61,535
Location
Strong Island NY
Country flag
Which saw is the jug for? Either I missed that or you never mentioned it.

Different models like different timing.

That’s a dual port cylinder fed setup, so some generalities do exist.

102 is likely fine, depending on the saw and displacement.

132, that has to raised. I would say 120-122 would be a good estimate.

87. That’s an issue. Probably roughen up bottom of intake port and clean well, add some tape to a piston to use a s a stop, and add JB. Keep Jug at an angle as the JB will self level to where you set the jug. Once hardened, I’d carve that port to 80*.

You took a lot from the band and base. There’s a few issues there:

You might hit the outer tunnels with the case or flywheel. Sometimes a fin hits the PTO Case side too, can be tough to notice.

May have tons of compression. May hit plug with piston. Add some clay and check.

The base. Generally want to keep .250 minimum, though I’ve gotten away with less without an issue.

Continued good luck to you on your maiden voyage.
 

drf256

Dr. Richard Cranium
GoldMember
Local time
10:01 PM
User ID
319
Joined
Dec 29, 2015
Messages
9,357
Reaction score
61,535
Location
Strong Island NY
Country flag
More compression ain’t always a good thing. You’re robbing power from a saw and the increased combustion efficiency net gain will be lost at some point.

The added heat from the compression will cause the saw to get hotter in long cuts and lean out.

Take a comp reading when you are set up. Report back.
 

Stihlmar

Well-Known OPE Member
Local time
9:01 PM
User ID
4455
Joined
Oct 26, 2017
Messages
50
Reaction score
97
Location
Tipton, IA
You are completely right. I never really did say what this jug was for. It’s a ms660 WarHawk I think was the brand name. Got it from HL and it’s going on my Asiany 660. I bought it all just to play around with.

I never had any goals with this jug, just started cutting and here is where I’m at. I realized I took an awful lot when I cut the base and slide the piston in. Haven’t checked spark plug clearance yet tho. It only Freeport’s about .01 which I was assuming would be more before I cut the base.

You confirmed my thoughts almost exactly on the numbers. Still don’t have a set goal but would like to get close to 100/120/85? So I will raise transfers and exhaust. I realize intake timing is a large part of it all and we usually want more. But when is more too much? I have no problem filling and grinding to a more usable number. But what is the affects of too much intake?

The Asiany cases had to be ground on both sides. PTO alittle and a lot of the flywheel side. Even had to grind on the transfer tunnel to spare ruining my flywheel. (Got impatient)

I will continue grinding and get some updates. Thanks for the wisdom everybody.
 

Attachments

  • 23C26FB2-459E-4192-8C55-B16CF01C3FBA.jpeg
    23C26FB2-459E-4192-8C55-B16CF01C3FBA.jpeg
    115.2 KB · Views: 31
  • 4E192326-187A-4819-8C1B-535A455DD927.jpeg
    4E192326-187A-4819-8C1B-535A455DD927.jpeg
    121.9 KB · Views: 33
  • 846763E7-5479-436B-83C7-FF45A0298D42.jpeg
    846763E7-5479-436B-83C7-FF45A0298D42.jpeg
    99.7 KB · Views: 29

Stihlmar

Well-Known OPE Member
Local time
9:01 PM
User ID
4455
Joined
Oct 26, 2017
Messages
50
Reaction score
97
Location
Tipton, IA
Raising exhaust helps bleed off some compression?
 

mdavlee

Hillbilly grinder
Local time
10:01 PM
User ID
279
Joined
Dec 28, 2015
Messages
14,194
Reaction score
64,603
Location
TN
Country flag
When cutting by hand go in 1/4 turns. Chatter will be about 1/3 as bad as that. 3 turns with lot of pressure and one turn with light down and then clear chips is what I always did
 

Stihlmar

Well-Known OPE Member
Local time
9:01 PM
User ID
4455
Joined
Oct 26, 2017
Messages
50
Reaction score
97
Location
Tipton, IA
Worked on the cylinder tonight. To impatient to take pictures and it’s nothing you guys haven’t seen before. Just worse. I don’t have all the fancy tools and it’s all AM chit.

Raised tranfers and exhaust. Put jb weld in intake. Plug looks to be dang close but doesn’t hit. Hoping to get comp check and possibly proof of life tomorrow.

Exh. 100 Trans. 120. Hope to get intake to 83

A very long intake duration will cause sluggish acceleration and extra fuel usage? Is that correct?
 

davidwyby

Tree felling enthusiast
GoldMember
Local time
7:01 PM
User ID
5156
Joined
Jan 24, 2018
Messages
7,868
Reaction score
29,139
Location
Extreme Southeast CA
Country flag
I’m a noob to porting messing with AM junk too but I think so. Check out my 2159 thread, towards the end. My intake is 82 and it’s a tractor EDIT: torquey, kinda cool. Your exh at 100 is better than mine at 102 I think.
 
Last edited:
Top