High Quality Chainsaw Bars Husqvarna Toys

044 project

BuckthornBonnie

Pinnacle OPE Member
Local time
8:47 AM
User ID
1725
Joined
Aug 22, 2016
Messages
956
Reaction score
1,639
Location
Penn Yan, NY
Country flag
In reference back to posts #22 and #23, I'm pleased to report that I was able to rebuild the MS440 that was trashed by a tree drop and log crush (AM parts). I had no idea whether is would start and run when repairs were complete. It did and ran like as if nothing had happened.

The owner is a very satisfied tree trimmer. My total parts cost was about $150 and the saw is running today on the job. He told me that the tree's log that fell on that MS440 was 40 feet up and so heavy that they had to use a fork lift to carry it away. The case, top end, bar, and chain survived but not much else did. Frankly, I was astounded that it still runs well.
Good to hear.
 

MattG

Chainosaurus Rex
Local time
1:47 PM
User ID
3111
Joined
Apr 30, 2017
Messages
896
Reaction score
1,432
Location
Cambridgeshire, England
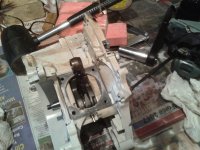
Well, finally the 12mm crank is in the old 10mm casings. I want to say thanks for the encouragement so far, esp. to @huskihl since that technique for getting the crank in nice and free-running on both sides (i.e. leave it with a decent gap between the c/wheel and the bearing case at first, using the feelers to check, then downsize on each side as appropriate when you get the last side on, then tap the crank ends gently) was very helpful. So I'm pretty pleased with progress now.

At last!

2017-07-23 12.53.02.jpg

My next job/worry though is increasing the clearance between b/end and the casing somewhat, to account for heat expansion and vibration.

I'd really like some more advice on this people! I've got between 3-4 thou in the tightest spot (pretty hard to measure precisely!). But I'm thinking that I should be aiming for at least 10 thou....what do others think?

:nusenuse:
 
Last edited:

MattG

Chainosaurus Rex
Local time
1:47 PM
User ID
3111
Joined
Apr 30, 2017
Messages
896
Reaction score
1,432
Location
Cambridgeshire, England
So tell me people, has anyone out here gone the whole hog with a 12mm crank in 10mm casings already?

I know that several of you have mentioned the clearance issue, but I wondered if anyone had just kept grinding till it all worked, or whether you'd done something different with the parts in the end.
 

MattG

Chainosaurus Rex
Local time
1:47 PM
User ID
3111
Joined
Apr 30, 2017
Messages
896
Reaction score
1,432
Location
Cambridgeshire, England
Yes, both Jacob and I have done several of these transplants though it was quite a few years ago..
Hi Basher,

Is your memory good enough still :p for you to give me any guidance on this clearance (see #76 and #83 ) between the big end and the casing inside? Couple of folks were saying .003" is too tight (I'm inclined to agree), I kinda recollected that the valve clearances on my car are about .010". Some I'm just trying collect a few ideas for how much more to lose, before the dremel gets put away for now.
 

Basher

Pinnacle OPE Member
Local time
9:47 AM
User ID
552
Joined
Jan 16, 2016
Messages
1,299
Reaction score
4,254
Location
Canada
Country flag
We both removed some material from the crank big end as well as the case, I wanted .010 or more clearance, may not be totally necessary but better safe than sorry. My transplants went on to work very well with no issues, they are still working as firewooder saws more than 5 years or more.
 

MattG

Chainosaurus Rex
Local time
1:47 PM
User ID
3111
Joined
Apr 30, 2017
Messages
896
Reaction score
1,432
Location
Cambridgeshire, England
We both removed some material from the crank big end as well as the case, I wanted .010 or more clearance, may not be totally necessary but better safe than sorry. My transplants went on to work very well with no issues, they are still working as firewooder saws more than 5 years or more.
Thanks Basher! It's encouraging that you got reliability after getting .010 clearance. I think that's what I'll go for, but I'm leaving the crank big end well alone.
 

Basher

Pinnacle OPE Member
Local time
9:47 AM
User ID
552
Joined
Jan 16, 2016
Messages
1,299
Reaction score
4,254
Location
Canada
Country flag
Yeah, I know,everyone had the same opinion back when we swapped the cranks but taking .005 off the big end of the crank didn`t bother a thing. My first transplant I only ground out the case,that worked well but on ones after that I took some off each with no apparent problems to date. On the 044 the rod end extends .035 out further than the crank counterweights at BDC so its easy to remove .005 from it but takes some care not to get grindings into the bearings, that is where hard grease packed into the bearing first comes into use.
 

MattG

Chainosaurus Rex
Local time
1:47 PM
User ID
3111
Joined
Apr 30, 2017
Messages
896
Reaction score
1,432
Location
Cambridgeshire, England
Yeah, I know,everyone had the same opinion back when we swapped the cranks but taking .005 off the big end of the crank didn`t bother a thing. My first transplant I only ground out the case,that worked well but on ones after that I took some off each with no apparent problems to date. On the 044 the rod end extends .035 out further than the crank counterweights at BDC so its easy to remove .005 from it but takes some care not to get grindings into the bearings, that is where hard grease packed into the bearing first comes into use.
Well it's nice to hear that you got your clearance with only case grinds. I just shy away from touching con-rods ever since reading a motorcycle+kart tuning book, which mentioned words to the effect that some rods go through shot-peening process to work toughen their skin. Presumably that's most applicable for full-racing applications - still that's the root of my fear.

But regardless, your 010" hint (and assurance) is what I needed for now. Thumbs up buddy!
 

MattG

Chainosaurus Rex
Local time
1:47 PM
User ID
3111
Joined
Apr 30, 2017
Messages
896
Reaction score
1,432
Location
Cambridgeshire, England
Well seeing as in basher's first he only removed from the case, then I'm good to stick with that. It's tedious, but I'm for leaving the rod alone. FWIW I'm guesstimating that I've taken 0.015" out of the case at the most. So it looks as if I'll be taking another 0.005" - but it's hardly precision engineering!
 

MattG

Chainosaurus Rex
Local time
1:47 PM
User ID
3111
Joined
Apr 30, 2017
Messages
896
Reaction score
1,432
Location
Cambridgeshire, England
Let's see your conrod big end. I would probably dress it as well.
I'm leaving work nowish, and seeing as it's probably raining, I'll head to the w/shop and see if I can get a few piccies for you and upload them later on today. Probably grind out another couple thou from the case first.
 

MattG

Chainosaurus Rex
Local time
1:47 PM
User ID
3111
Joined
Apr 30, 2017
Messages
896
Reaction score
1,432
Location
Cambridgeshire, England
@blsnelling
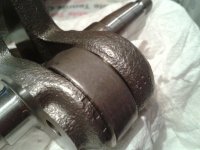
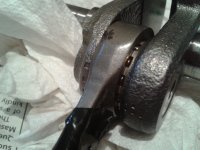
Well I took a couple of piccies of the big end

2017-07-24 16.01.32.jpg

2017-07-24 16.03.15.jpg
I think I can make out some kind of toughened skin on the rods. I'm kinda reserved about messing with them to be honest.

Anyway I reckon that I'm now very close to what I want right now, after this evening grinding session, still just with case grinds. Since I've concentrated on only grinding the area immediately under the path of the b/e (and trying to blend, ahem, this up to the surrounding), I've for obvious reasons, not touched the region where the gasket sealing face is. That's great - but it does make for it being damn hard to get a 10 thou feeler in there due to the curvature in 2 planes!

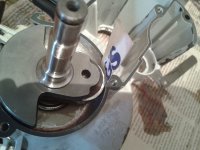
So what I managed to find in the w/shop is a business card from my supply shop, which measures at being about 14 thou thick. This is much easier to manipulate....and thus to get a handle on where the grinding is at:

2017-07-24 17.32.26.jpg

I'm now getting this card to run between the case and the end, with slight rubbing. In my opinion, that means things are all good. Well nearly, there's the odd bit (pictured) where it's a tad grabby / jammed up. I'll attack just these selected areas another time. But I reckon that I'm nearly there.
 

MattG

Chainosaurus Rex
Local time
1:47 PM
User ID
3111
Joined
Apr 30, 2017
Messages
896
Reaction score
1,432
Location
Cambridgeshire, England
Ok, so I've not forgotten about this project, but kinda had a break in it due to going on holiday and having absolutely heaps of work at home trimming (and lowering) our boundary hedging.

Well I've just spent several (very enjoyable...hmm..) hours with a 5mm file and the dremel trying to fit the 460 jug onto my 044 cases. So after listening to a machinist friend and spending a while with the 044 base gasket, I taped down the gasket to the jug base to use a template and proceeded:
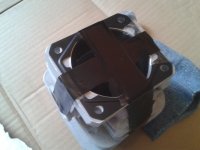
2017-08-17 10.07.31.jpg

Eventually I got the thing down with the screws running free but still snug (hopefully)
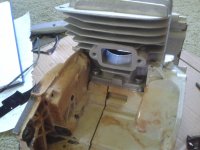
2017-08-17 16.20.05.jpg
I really hope that the resulting job has the jug fitting "square" enough, this aspect was a real ar$e, as are no alignment (ha ha) marks, just gut feel at the end of the day
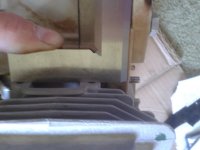
2017-08-17 16.18.21.jpg
Well the next plan, I suppose is to reinstall the 12mm w/p crank back in, and the piston, and the flywheel and then pray and see if it all turns around nice and smooth. (Please!!).

Then I'll be respraying the casings with tractor paint as recommended by @Adamski . Have to say, though, that I'm feeling a tiny bit despondent about the project right now....i.e. basically worrying if the piston will be lined up correctly to in the jug, and that all things that need to fix to the jug (induction hose/carb/muffler etc.) will fit square enough.....Definitely in need of some encouragement here people....
 
Top