High Quality Chainsaw Bars Husqvarna Toys

MS390 / 039 pop up piston

Terry Syd

Pinnacle OPE Member
Local time
6:42 PM
User ID
575
Joined
Jan 18, 2016
Messages
1,589
Reaction score
5,973
Location
Comboyne, NSW Australia
Country flag
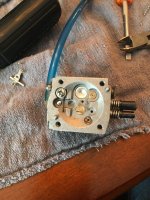
OK, I mentioned early on that I would post my Walbro HD-5 carb mods when I got it dialed in. Here's what I ended up with-

First, push out the main discharge nozzle and block off the inlet to the low speed circuit with a bit of GB Weld. Clean it up and put the nozzle back in. (This separates the two circuits and allows the low speed circuit to flow better)

Drill a 1mm hole in the wet side just before the low speed needle seat to allow flow through the low speed needle.

Drill out the auxiliary jet to .35mm

Pull the welch plug and drill each of the air bleed holes one size larger. Replace welch plug.

I used a slightly weaker metering spring to bring in the fuel a bit quicker (better throttle response).

The engine likes to cut around 11,400, but you can pull it down to where it won't bog, but the clutch will start to slip (indicative of a broad, flat torque curve that doesn't drop off the curve). - You can start the saw in the cut, bar buried in Ozzie hardwood using a 20" NK bar with an 8-pin and a full 6 degrees of cutting angle on the chain - in other words it has torque off the bottom.
 
Last edited:

Terry Syd

Pinnacle OPE Member
Local time
6:42 PM
User ID
575
Joined
Jan 18, 2016
Messages
1,589
Reaction score
5,973
Location
Comboyne, NSW Australia
Country flag
I should mention that I worked my way through those mods. The big thing is the combination/blending of the low and high speed fuel flows. I may have been able to achieve the same results, or better, by just blocking off the EPA circuit to the low speed circuit and then drilling the auxiliary jet (say to .40mm). In other words, I might have achieved the same results without pulling the welch plug and drilling the air bleed holes.

Throttle response is subjective and doesn't mean much in the real world of cutting wood. So making it a 'light switch' for throttle response isn't going to cut you any more wood - cutting wood with authority comes down to the fuel curves.
 
Last edited:

Fruecrue

certified hand catcher
Local time
4:42 AM
User ID
2417
Joined
Jan 4, 2017
Messages
4,391
Reaction score
21,689
Location
Alden NY
Country flag
I should mention that I worked my way through those mods. The big thing is the combination/blending of the low and high speed fuel flows. I may have been able to achieve the same results, or better, by just blocking off the EPA circuit to the low speed circuit and then drilling the auxiliary jet (say to .40mm). In other words, I might have achieved the same results without pulling the welch plug and drilling the air bleed holes.

Throttle response is subjective and doesn't mean much in the real world of cutting wood. So making it a 'light switch' for throttle response isn't going to cut you any more wood - cutting wood with authority comes down to the fuel curves.
What exactly are you referring to as the EPA circuit?
I am familiar with this carb.
 

Terry Syd

Pinnacle OPE Member
Local time
6:42 PM
User ID
575
Joined
Jan 18, 2016
Messages
1,589
Reaction score
5,973
Location
Comboyne, NSW Australia
Country flag
The EPA circuit is where the low speed circuit gets its' fuel. - It gets it from the HIGH SPEED CIRCUIT.

Check it out. The low speed circuit is tapped into the area around the main discharge nozzle.

When the main discharge nozzle starts to develop a 'low' signal into the carb it not only starts pulling fuel from the inlet to the high speed circuit, it also presents a 'low pressure' to the low speed circuit (the low pressure from the nozzle affects all the circuits).

This allows the carb to have decent throttle response when it first revs up, but then 'leans' out the low speed circuit when it starts coming on the venturi and while cutting. This cuts down the hydrocarbon emissions when the saw drops down in RPM (because of the lower RPM and more time allows for more of the intake mixture to escape out the exhaust port, BUT with the leaner low speed circuit mixture there is less hydrocarbon loss out the exhaust port)

It is a clever way to build a more EPA compliant carb, but it doesn't give the best powerband for a work saw.
 

Terry Syd

Pinnacle OPE Member
Local time
6:42 PM
User ID
575
Joined
Jan 18, 2016
Messages
1,589
Reaction score
5,973
Location
Comboyne, NSW Australia
Country flag
Good picture to show others what the mod looks like.

The 'auxiliary jet' is the brass jet next to the welch plug. I drilled mine out to .35mm on this carb, but it could be that a .4mm drill would work better and be a simpler mod that avoids pulling the welch plug and drilling the air bleed holes.
 

Terry Syd

Pinnacle OPE Member
Local time
6:42 PM
User ID
575
Joined
Jan 18, 2016
Messages
1,589
Reaction score
5,973
Location
Comboyne, NSW Australia
Country flag
Going back through this thread I saw on page 17 in post 331 there was a picture which showed the relationship of the nozzle and the EPA circuit. If anyone is having trouble conceptualizing the way it was designed and how it works, that visual representation may help.

http://opeforum.com/threads/ms390-039-pop-up-piston.9517/page-17
 

Lowey79

Well-Known OPE Member
Local time
6:42 PM
User ID
18011
Joined
Aug 1, 2021
Messages
10
Reaction score
16
Location
Australia
Country flag
Thought I’d dig up this old thread rather than start a new one…

what would be the benefits to the above carb mod over the stock carb?

My 390 is running the Hiway cylinder with the pop up piston that I cut the lower sides off the skirt to improve the lower transfer flow. I’ve also opened the muffler and outlet cover up to roughly 80% of the port area.

Also, how do you pinpoint the location of the hole required to feed the low circuit?

cheers.
 

Terry Syd

Pinnacle OPE Member
Local time
6:42 PM
User ID
575
Joined
Jan 18, 2016
Messages
1,589
Reaction score
5,973
Location
Comboyne, NSW Australia
Country flag
how do you pinpoint the location of the hole required to feed the low circuit?

You use the low speed needle. When you screw the needle in all the way the needle will be seated. Measure the length of the low speed adjustment screw that is sticking out of the carb (or mark the screw at carb body).

Take the screw out of the carb and lay it on top of the wet side. If you place the needle in the same position it was when the needle was seated, then that tells you where the needle seat is. Do not drill there, you want to protect the needle seat.

Make a mark a couple of millimeters away from the location of the seat and drill the hole.
 

Lowey79

Well-Known OPE Member
Local time
6:42 PM
User ID
18011
Joined
Aug 1, 2021
Messages
10
Reaction score
16
Location
Australia
Country flag
Thanks for that Terry.

so reading back through the last couple of pages, this carb mod will improve low side stability and richen up the transition a little. Is this correct?
 

Terry Syd

Pinnacle OPE Member
Local time
6:42 PM
User ID
575
Joined
Jan 18, 2016
Messages
1,589
Reaction score
5,973
Location
Comboyne, NSW Australia
Country flag
Mostly it is to keep the low speed circuit flowing well when the revs drop. If you want a saw with good low speed torque, then this is a mod to make on the Walbro with one of those EPA circuits. Yes, you will create more emissions, that is a matter for you to decide.
 

Lowey79

Well-Known OPE Member
Local time
6:42 PM
User ID
18011
Joined
Aug 1, 2021
Messages
10
Reaction score
16
Location
Australia
Country flag
When drilling the brass jet, do you need to remove it from the carb body first, or can you blow the swarf out?
 

Terry Syd

Pinnacle OPE Member
Local time
6:42 PM
User ID
575
Joined
Jan 18, 2016
Messages
1,589
Reaction score
5,973
Location
Comboyne, NSW Australia
Country flag
Just drill it in place. The first run through it with the .3mm reamer takes some patience. Take it real slow, almost everybody breaks this first reamer trying to expedite the process. After the first reamer, the others take much less time.
 

Terry Syd

Pinnacle OPE Member
Local time
6:42 PM
User ID
575
Joined
Jan 18, 2016
Messages
1,589
Reaction score
5,973
Location
Comboyne, NSW Australia
Country flag
The two-stroke mixture will leave a thin layer of oil on the jet. Use contact cleaner, brake cleaner, something to wash off the oil. You want the reamer to cut into the jet.

I use a chair with two arm rests to help steady my hands as I twist the reamer. Remove the pump side cover to allow the carb to sit flat on the edge of your desk.

Good luck...
 

Lowey79

Well-Known OPE Member
Local time
6:42 PM
User ID
18011
Joined
Aug 1, 2021
Messages
10
Reaction score
16
Location
Australia
Country flag
Well the was a very fiddly process, JBweld should be cured this evening.
I found the 0.3 and 0.4 reamers went through pretty easy, but the 0.35 was an absolute PITA and took forever! But all done, cleaned out and reassembled ready to test after work tonight.
I’ve also advanced the ignition timing 0.020” so I’m really keen to get this thing in some wood and see how it runs!
 
Top