High Quality Chainsaw Bars Husqvarna Toys

How to make a band cutting mandrel

GoBigBlue1984

Bluegrass Fart Knocker...
GoldMember
Local time
4:47 PM
User ID
450
Joined
Jan 8, 2016
Messages
1,411
Reaction score
5,236
Location
Kentucky
Country flag
It takes me 5 minutes to dial a cylinder in.

1) I bolt it to the plate in the 4 jaw and use then adjust the 4 jaw to rough in the outside of the cylinder. I'm just trying to get it withing 0.200" run out here.
2) Then I run the test indicator up and back down the bore in the gap between the transfer port and exhaust port. Adjust the clamp bolts/studs until there is no run out, here you are squaring the cylinder to the X of the lathe.
3) Turn cylinder to other side of exhaust port and repeat.
3+) If you can run up/down the intake side without hitting the transfer you can do both sides to adjust for cylinder taper.
4) Once the cylinder is square to the X of the lathe then I put the test indicator up towards the squish band and adjust the 4 jaw to remove run out there while spinning the chuck by hand.
5) Then check the outside of the bore, it's usually off a 0.010" or so from moving the jaws.
6) You can run up and down the bore again if it's way far off (go back to step 2) or just iterate run out at TDC and BDC like you would normally do (back to step 4).
Exactly as I described above, but explained in greater detail.
 

GoBigBlue1984

Bluegrass Fart Knocker...
GoldMember
Local time
4:47 PM
User ID
450
Joined
Jan 8, 2016
Messages
1,411
Reaction score
5,236
Location
Kentucky
Country flag
According to your write up you don't do steps 2 and 3.
Was at work, in a hurry, left that part out. I guess I thought that would be a given. That's how you indicate any finished part up in a 4 jaw. Either you indicate 2 ends till they both run zero/zero or if you have a face or a shoulder you indicate that flat and then a diameter. I couldn't put a number on the parts I've lined up in a 4 jaw but it probably numbers over a thousand. This is all I've ever done.

I wasn't writing a detailed how to guide to lining up a cylinder in a lathe. If was, a video would've been much easier. My only purpose was to say it takes ten minutes to do it and give some an idea.
 

GoBigBlue1984

Bluegrass Fart Knocker...
GoldMember
Local time
4:47 PM
User ID
450
Joined
Jan 8, 2016
Messages
1,411
Reaction score
5,236
Location
Kentucky
Country flag
It's good to stay sharp. Keeps your head clear
I agree, I used to hate trig but in my job I use it daily. It's kind of fun actually and not as complex as it's made out to be.
 

srcarr52

Shop rat, backyard slice cutter.
GoldMember
Local time
4:47 PM
User ID
522
Joined
Jan 12, 2016
Messages
3,952
Reaction score
26,059
Location
Iowa City
Country flag
Was at work, in a hurry, left that part out. I guess I thought that would be a given. That's how you indicate any finished part up in a 4 jaw. Either you indicate 2 ends till they both run zero/zero or if you have a face or a shoulder you indicate that flat and then a diameter. I couldn't put a number on the parts I've lined up in a 4 jaw but it probably numbers over a thousand. This is all I've ever done.

I wasn't writing a detailed how to guide to lining up a cylinder in a lathe. If was, a video would've been much easier. My only purpose was to say it takes ten minutes to do it and give some an idea.

That may seem obvious to us. But to those starting, knowing to indicate the face after rough in can make the difference between 45 mins and 10 mins.

I was trying to point out the biggest time saver so people don't waste their time making squish cutting mandrels for ever saw they do.
 

dieselfitter

Pinnacle OPE Member
Local time
3:47 PM
User ID
266
Joined
Dec 26, 2015
Messages
474
Reaction score
2,660
Location
MN
Country flag
Have any of you seasoned saw molesters tried delrin for your mandrels? Curious if it will hold up or me sturdy enough to not deform under cutting pressure. I like the idea of it for bore protection as it would be pretty hard to scratch anything with it but don't want to waste a ton of money on making some out of it just to toss em out.
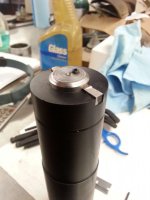
Here is one I made using Delrin. Some Poulans have aluminum bores. I figured plastic won't scratch it. The slug is pressed into the delrin. The groove in the delrin keeps the steel slug and cutting bit from turning. The cutting tool is offset to locate the cutting edge on center.
I had to remove more of the slug where it protrudes above the cutter. It now fits within the combustion chamber while cutting squish. It can also be used to cut the base. I'm going to try some O rings in grooves in an attempt to adapt it to additional larger bore sizes.
20160510_124728.jpg
BTW his stuff works great for cutting squish. https://www.zoro.com/tap-magic-cutt...yiOeaBEfthUSVYId5fb2oaAmLw8P8HAQ&gclsrc=aw.ds
It gives a better finish with less chatter.
 

GoBigBlue1984

Bluegrass Fart Knocker...
GoldMember
Local time
4:47 PM
User ID
450
Joined
Jan 8, 2016
Messages
1,411
Reaction score
5,236
Location
Kentucky
Country flag
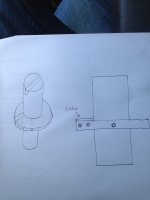
What I was saying earlier about making a single mandrel........do just as you guys already have and instead of making a mandrel for every saw, pick a nominal bore. Let's say 44mm.

Use delrin, nylon, uhmw, aluminum, ultem......whatever you may choose and bore some sleeves. You'll want the mandrel to be a slip fit into the sleeve. the sleeve acts more or less a guide. the other end of the mandrel will be threaded, Fine pitch.

Now, a collar will be made to thread over the mandrel. a tapped hole will then need to be put in the collar for a set screw.

The mandrel, Slipped inside the sleeve will then be dropped into the cylinder and the tool bit will bottom out at the squish band. Screw the collar onto the other end of the mandrel. We want to take .030 from the band. Before the collar screws down flush with the base of the cylinder or the cylinder extension, put a .030 feeler gage or some type of shim stock between the base and the collar. Tighten the collar down till it hits the feeler gage/shim and tighten the set screw. This will keep the collar from moving during the cut thus distorting the desired amount to be removed.

Pull the shim stock out and begin cutting. Cut until the collar bottoms out on the base and voila! .030 has just been removed from the band. No guesswork involved.

Any interest?
 

GoBigBlue1984

Bluegrass Fart Knocker...
GoldMember
Local time
4:47 PM
User ID
450
Joined
Jan 8, 2016
Messages
1,411
Reaction score
5,236
Location
Kentucky
Country flag
The collar or the mandrel end wouldn't have to be threaded. A couple of flats on the mandrel and set screws in the collar would likely suffice as well. The collar and mandrel would both be any type of steel. 1018 or something comparable.

If I get time here over the next few days I'll mock one up and go from there. I'll give it to somebody here on the forum........I'm confident it'll work.
 

GoBigBlue1984

Bluegrass Fart Knocker...
GoldMember
Local time
4:47 PM
User ID
450
Joined
Jan 8, 2016
Messages
1,411
Reaction score
5,236
Location
Kentucky
Country flag
Here is one I made using Delrin. Some Poulans have aluminum bores. I figured plastic won't scratch it. The slug is pressed into the delrin. The groove in the delrin keeps the steel slug and cutting bit from turning. The cutting tool is offset to locate the cutting edge on center.
I had to remove more of the slug where it protrudes above the cutter. It now fits within the combustion chamber while cutting squish. It can also be used to cut the base. I'm going to try some O rings in grooves in an attempt to adapt it to additional larger bore sizes.
View attachment 27111
BTW his stuff works great for cutting squish. https://www.zoro.com/tap-magic-cutt...yiOeaBEfthUSVYId5fb2oaAmLw8P8HAQ&gclsrc=aw.ds
It gives a better finish with less chatter.
I used tap magic as well for years and loved it. But the new recipe thinned it out quite a bit, I've switched to a cutting fluid made by union butter field and it's much thicker than the tap magic and almost has a syrupy consistency and really holds well. I use it for most everything anymore, threading, tapping, occasionally drilling. Basically everything that's not getting coolant flooded to it. But generally you can't go wrong with tap magic.
 

Deets066

AKA Deetsey
Local time
4:47 PM
User ID
290
Joined
Dec 28, 2015
Messages
15,435
Reaction score
73,481
Location
Illinois
Country flag
The collar or the mandrel end wouldn't have to be threaded. A couple of flats on the mandrel and set screws in the collar would likely suffice as well. The collar and mandrel would both be any type of steel. 1018 or something comparable.

If I get time here over the next few days I'll mock one up and go from there. I'll give it to somebody here on the forum........I'm confident it'll work.
It sounds like a good idea. Is the cutter goin to be held in with set screws and just hang it out a bit for larger bores?

Also, what sleeves will you be making?
 

drf256

Dr. Richard Cranium
GoldMember
Local time
4:47 PM
User ID
319
Joined
Dec 29, 2015
Messages
9,389
Reaction score
61,687
Location
Strong Island NY
Country flag
What I was saying earlier about making a single mandrel........do just as you guys already have and instead of making a mandrel for every saw, pick a nominal bore. Let's say 44mm.

Use delrin, nylon, uhmw, aluminum, ultem......whatever you may choose and bore some sleeves. You'll want the mandrel to be a slip fit into the sleeve. the sleeve acts more or less a guide. the other end of the mandrel will be threaded, Fine pitch.

Now, a collar will be made to thread over the mandrel. a tapped hole will then need to be put in the collar for a set screw.

The mandrel, Slipped inside the sleeve will then be dropped into the cylinder and the tool bit will bottom out at the squish band. Screw the collar onto the other end of the mandrel. We want to take .030 from the band. Before the collar screws down flush with the base of the cylinder or the cylinder extension, put a .030 feeler gage or some type of shim stock between the base and the collar. Tighten the collar down till it hits the feeler gage/shim and tighten the set screw. This will keep the collar from moving during the cut thus distorting the desired amount to be removed.

Pull the shim stock out and begin cutting. Cut until the collar bottoms out on the base and voila! .030 has just been removed from the band. No guesswork involved.

Any interest?

I'd be interested Brett. What about one for base cutting? Use the same one, or make a variable sleeved one for that as well?

I have a few saws to do, and likeLy more in the future, that aren't the size of what I've got here.

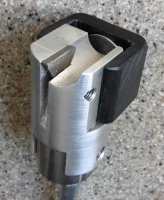
I like this one. (not mine)

View attachment 27138
That's @wcorey work. Brett, can you make some of these?
 

Time's Standing Stihl

Below me...
Local time
4:47 PM
User ID
1179
Joined
Apr 20, 2016
Messages
11,248
Reaction score
64,401
Location
Central Iowa
Country flag
I asked him over a year ago if he was making these. ...sure would be nice

Sent from my SM-G900R4 using Tapatalk
 
Top